


In this article, we’ll go over why you should edit your jewelry photos before posting them online as well as how to clip them with the best free software options available!
The Editing Difference
You’ve spent many hours on making your latest line of jewelry. You’ve spent another bunch setting up and completing a photoshoot of the new pieces. Now all you have to do is post them online, right?
Wrong!
While your photos can look great right after you snap them, especially on phones where complex algorithms do many basic adjustments behind the scenes, spending even just a little bit of time on editing the photos before posting them online can take them from good to amazing.
In this article we'll cover the following topics. If you're looking for help with something specific, click below.
How to Edit Your Jewelry Photos
Two Methods For Clipping Jewelry Photos
Advanced Editing Tools - When the basics just aren't enough
Fixing Overexposed/Underexposed Photos
Color Correcting Metals and Stones
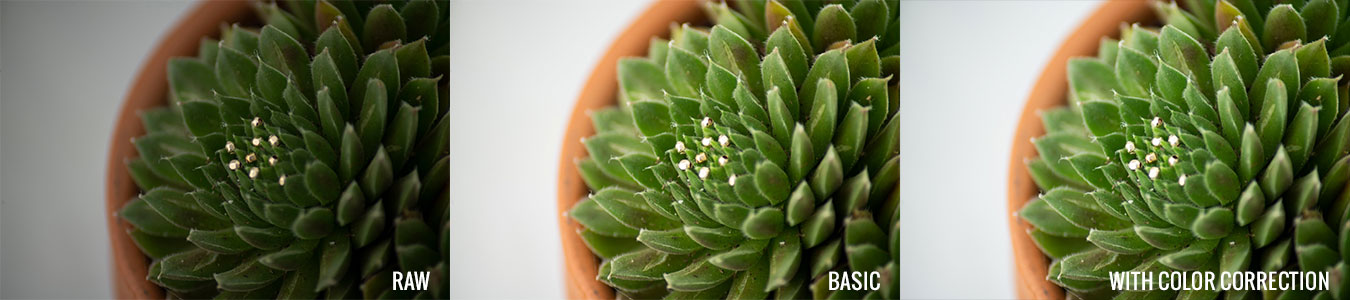
To illustrate the editing difference I want you to look at the photos below.
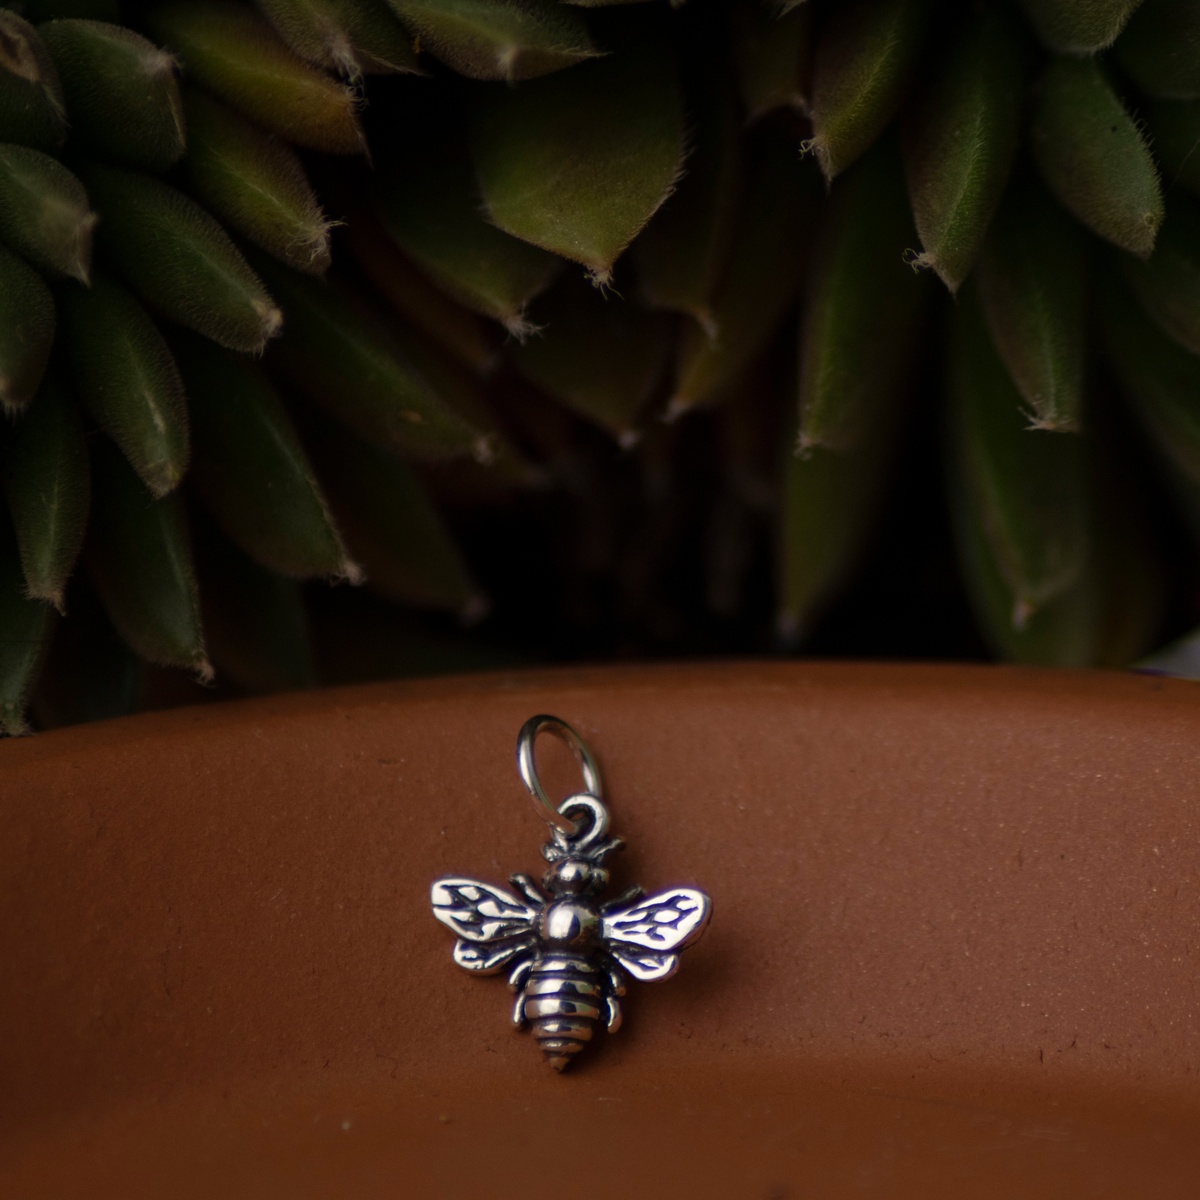
RAW Image
This first photo of our charm is right off a DSLR camera in RAW format (some smartphones have the ability to save in this format). RAW is a file type (think JPG) that saves more data than a JPG and therefore allows you greater latitude when editing your photos. As you can see, even though the piece is well lit the image is rather dark and under saturated.
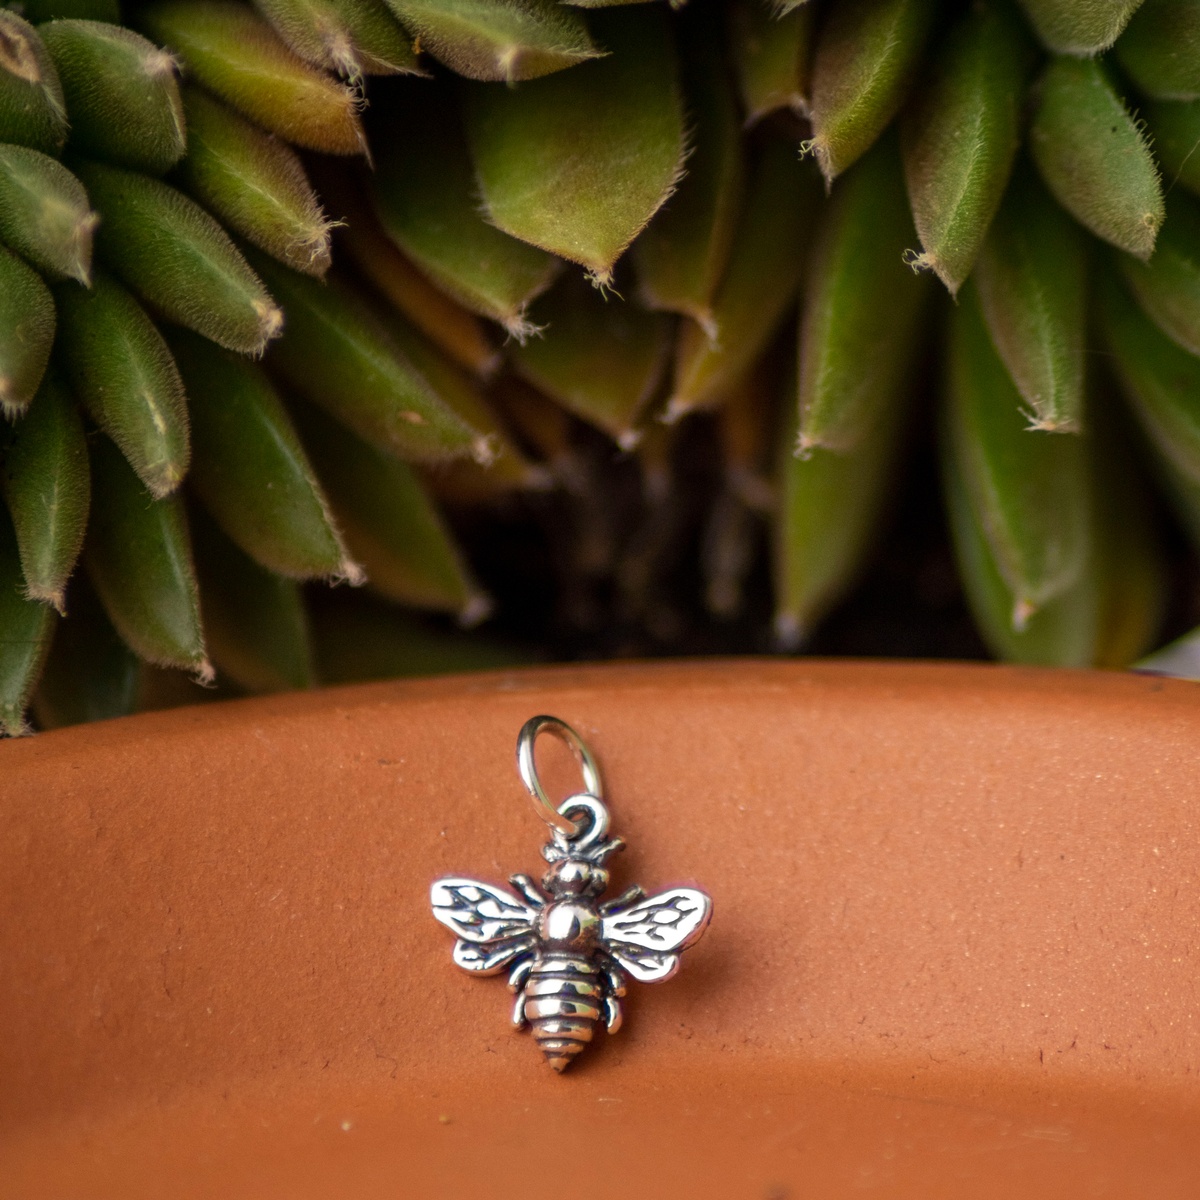
Add Basic Edits
Now we’ll show you the same photo with basic adjustments of things like brightness, contrast, and color. Already you can see a huge improvement in the look and feel of the image compared to the one before. If you were taking the same photo with your phone’s automatic camera settings, the photos should be similar due to your phone doing the basic adjustments already.
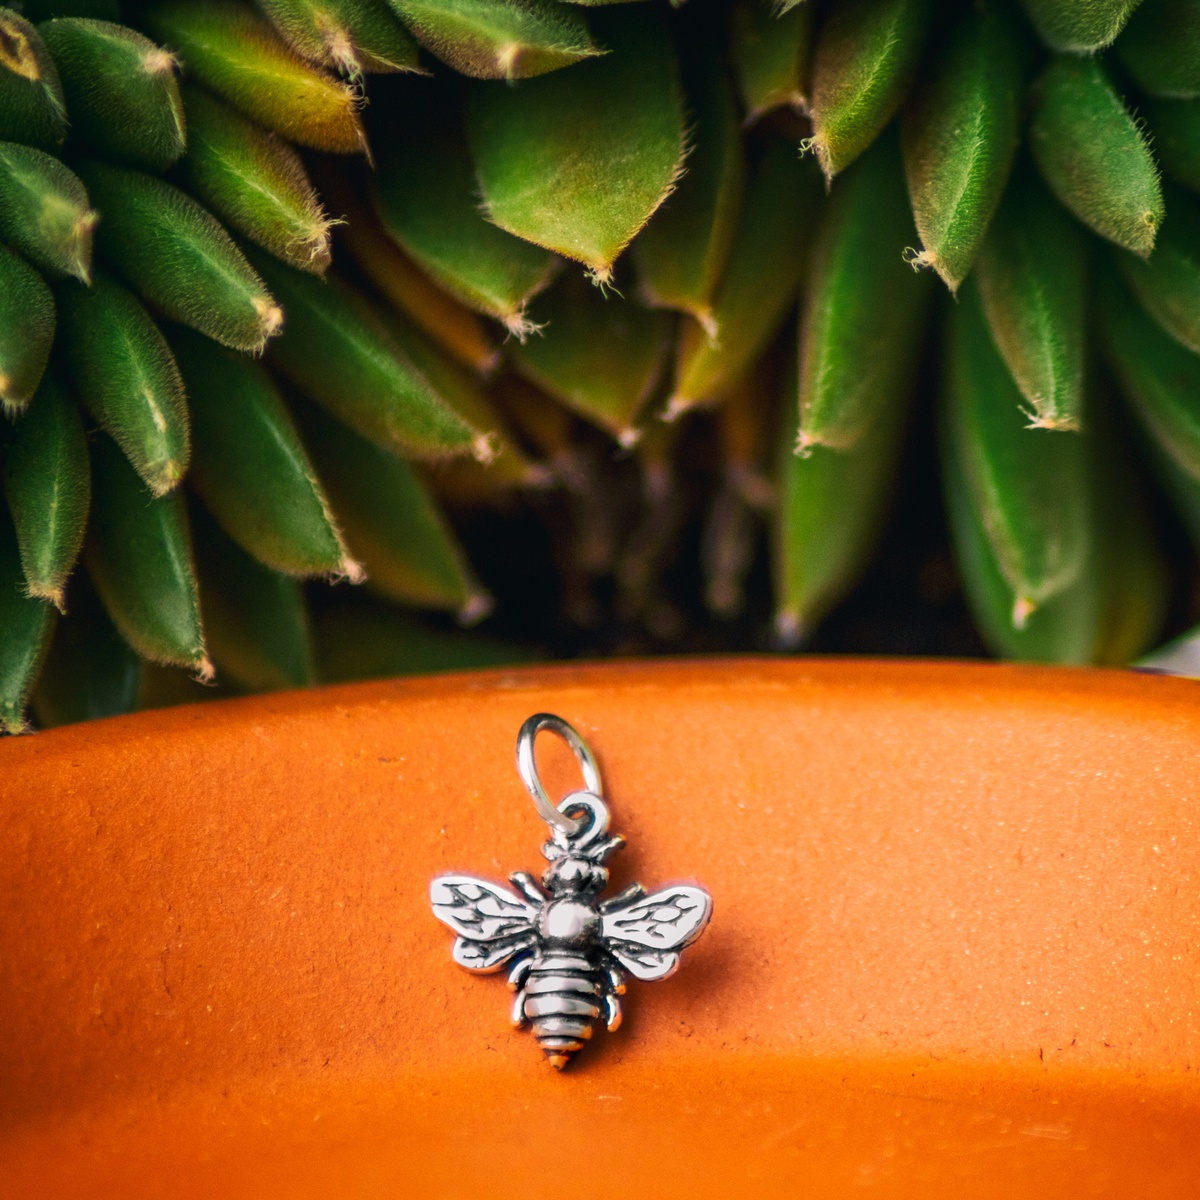
Make It Pop
The third photo is after more edits. Now this photo is a scroll stopper, the bright and vibrant colors are sure to catch any social media users' eye as they scroll through their feed. Here we’ve spot healed some dust and spots on the succulents to remove distractions as well as adding more brightness, contrast, and saturation. A filter was also added to give the photo set a distinct feel compared to the rest of our themed photos. Filters are a great way to give your brand and social media a cohesive look. If used consistently, social media users will automatically and subconsciously mark the photo as yours just by the feel of it, which is exactly what you want.
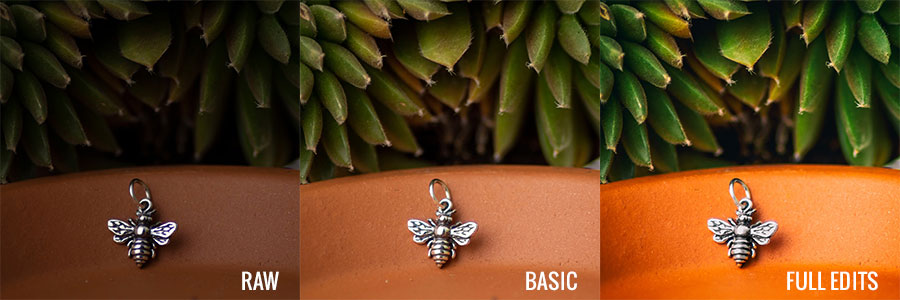
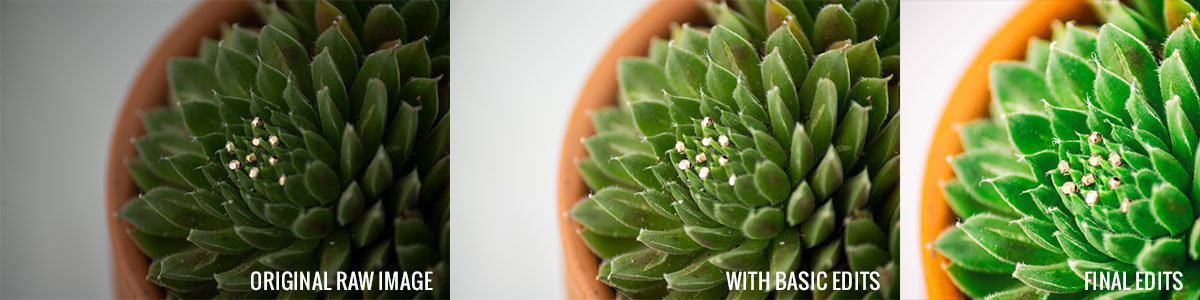
Now take a look at the comparison between all 3 and see how much of a difference the full edits can make.
How to Edit Your Jewelry Photos
Now that we’ve illustrated how much editing can make a difference on your jewelry photos, we’ll go over some simple steps that can make a huge difference. I’ll walk you through the steps as I edit one of our photos so you can see the process and the changes that occur. This is a product photo of gold-filled beads using a potted succulent as a seasonal prop. The jewelry photo I chose has an abundance of issues, including lots of gunk and debris from the soil in the plant. By using such an extreme case it should be easier for you to know what steps you’ll need to take when it comes to working on your own photos.
These steps may look overwhelming at first. But in as little as 6 minutes (or even less once you get the hang of it) spent in total on editing you will see a huge difference in your final images.
Step 1: Brightness & Contrast
Time - 1 minute or less
This is the most basic of edits and probably one of the more critical since it gets you to the starting point for other edits. If your photo is overexposed (too bright), you’ll want to bring down the brightness. If it is underexposed (too dark like the photo below), you’ll want to bring up the brightness. Most photos can also use a bump up in contrast. How much depends on both the photo and your personal taste, just remember not to overdo it. Toggle back and forth between the original and the updated version as you work on it to make sure you haven’t gone too far with the edits. While you can post after doing brightness and contrast, as discussed in the section before, more tweaking on your jewelry photography can make you stand out in the crowd!

Step 2: Color Correction/White Balance
Time - 1 minute (May be more if you are new to color correcting)
While important, this step is sometimes not needed. Smartphones and DSLRs have gotten extremely good at color correcting your photos when taking the shot but depending on the situation they can be off by quite a bit. Take the photo we are currently working on, it looks pretty good color-wise, right? For most people, I would say it’s good and go ahead and move on to the next step, but if we are being finicky, the color is slightly off with a bit of a yellow cast. As you can see below by removing the yellow cast the succulent now pops a bit more in color.
There are many ways to fix color that range from extremely simple to extremely complex. The most basic (besides using an Auto White Balance option) is adjusting the Temperature (Blues & Yellows) and Tint (Greens and Purples). This method was used to fix the image above by adding more blues in the Temperature setting and more greens in the Tint.
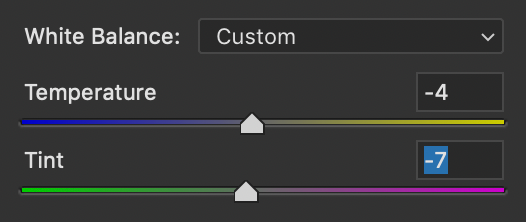
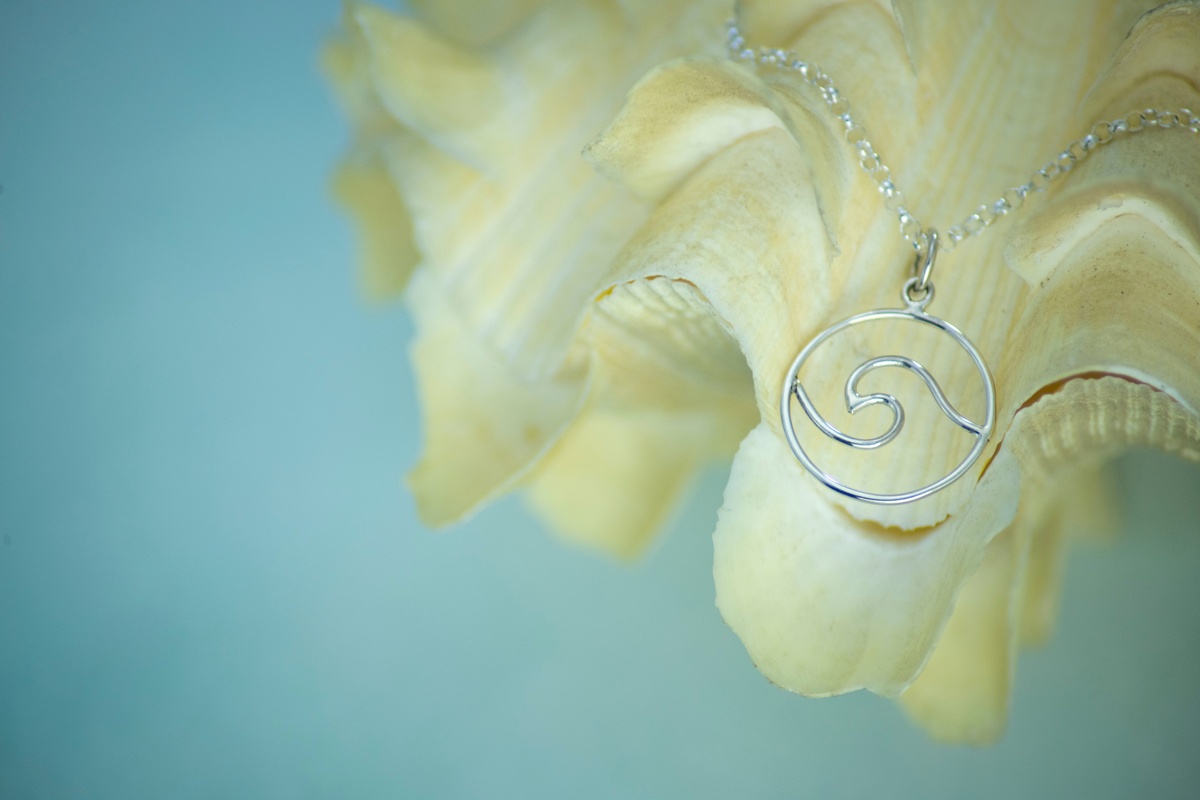
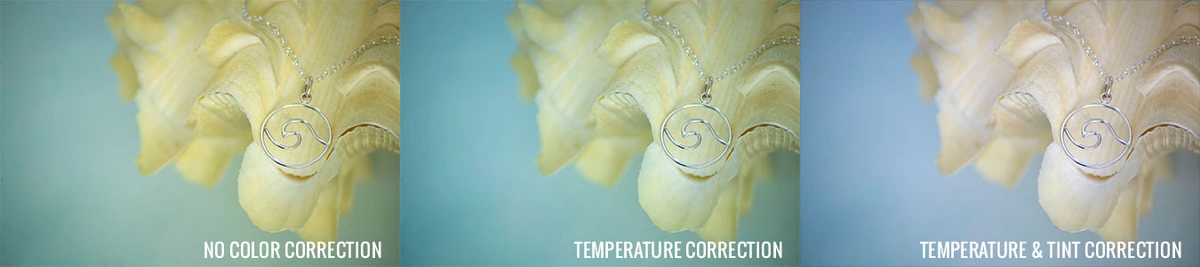
If you are having a hard time seeing the differences above, below is an image that needs extreme color correcting. As you can see it has an extremely yellow-green color cast.

In cases like this, what you’ll want to make the changes bit by bit. Start off with what you know – the image looks too yellow. The green cast is hard to discern at this point, but you do know you need more blue. So first you’ll drag the Temperature slider to the blues section. Once you get to the point that the image is starting to look too blue but the color is still off you know you need to work on the tint. Adjust the Temperature so the image is before the too blue point and move over to the Tint.
Now that the Temperature has been adjusted, it’s easier to see that there is now a green cast to the image. In the Tint settings add more purple to the image until it looks true to life. You may need to make small adjustments back and forth in the Temperature & Tint sliders to get the perfect combination.
As you can see below, by adding more blues in the Temperature and purples in the Tint the image has drastically improved.
If you feel the Temperature/Tint method is just not cutting it you do have other options. The Curves fix is more complex but offers greater control over what areas are color corrected. Let’s say you have an image where everything looks good except the shadows seem to have too much blue in them. You could use the Temperature/Tint method, but that will just adjust the whole image and you’ll have to spend time masking out the areas you don’t want to be affected.
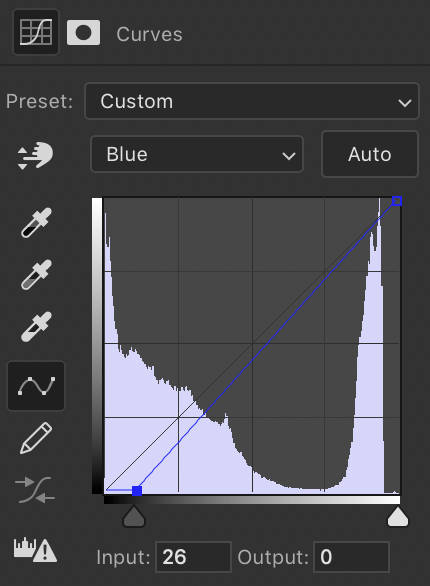
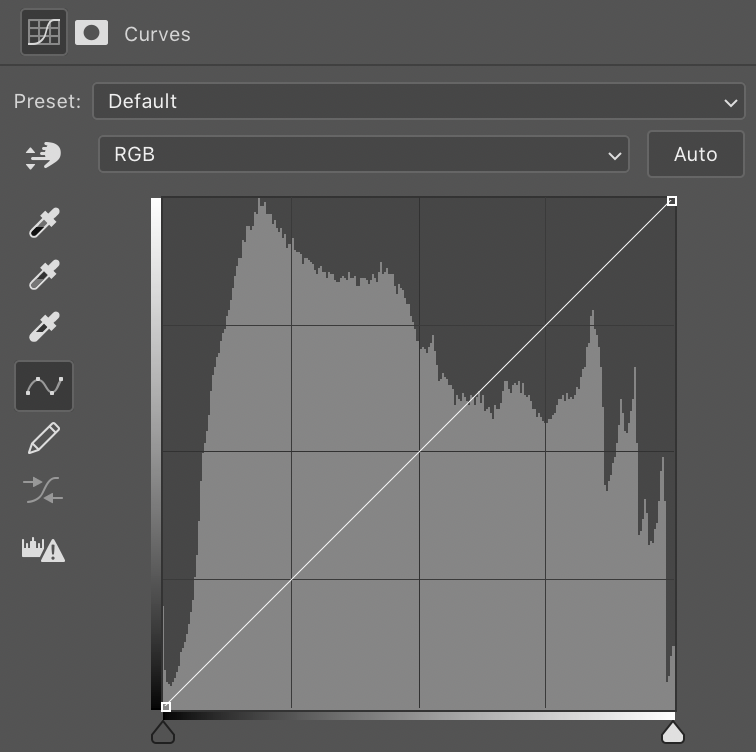
Using the Curves tool you’ll be able to target the Lights, Midtones, and Darks of an image directly and adjust their RGB (reds, greens, & blues) levels. The lower left point adjusts the shadows, while the upper right adjusts the highlights. If you wanted to add blues to any point, you would move those points towards the upper left corner. If you wanted to remove blues (aka add yellow) you would move the points towards the lower right corner. Therefore if you wanted to remove blue from the shadows of your image, you would move the lower-left point to the right, as seen in the image. You can create new points anywhere in between on the line to adjust the mid-tones accordingly.
Tip 1 - Sometimes your eyes become biased to color as you edit so a good way to see if you've done a good job or have gone too far is to walk away for a few minutes then come back to the photo. Your eyes will now be adjusted to the real world and will let you know if your jewelry photo has been over corrected or not.
Tip 2 - Adjust your monitor color. While modern monitors do a better job making colors more true to life, your monitor may still be off. Look for tutorials on how to correctly adjust your monitor and do so as you are ending the day. Your eyes will be biased on the color (like as discussed with Tip 1) and will look off after you've corrected it so by doing this at the end of the day, you'll start the next day with the correct coloring that you won't feel looks off.
Tip 3 - If you want to take the guess work out of color correcting, you can buy a gray card. These provide a neutral gray in your jewelry photos that you can use as a point of reference when you go to fix the white balance. Place the card with the jewelry setup at the beginning of each new lighting setup (so if the lighting never changes, you don't need to worry about getting multiple gray card shots). When you start to color correct, most programs offer an eyedropper tool in the White Balance editor that will allow you to select the gray card as the neutral spot. If you move the eyedropper tool around you can see how hovering over differently areas of the image affects the color cast. If you hover over a blue spot, the overall image will take on a yellow tone in order to make the blue spot appear gray. So with the gray card, you know you'll always be giving the eyedropper tools a perfectly neutral gray spot to work with. Once you've selected the neutral gray, you'll be able to see what the exact adjustments you'll need to make for the rest of your photos. You might need to make these adjustments by hand (so write down the adjustment numbers), but some programs will let you apply the edits from the last photo you worked on (which is a great time saver!)
Step 3: Editing Your Jewelry Photography for More Impact
Time - 1 to 3 minutes (depending on your aesthetic preferences)
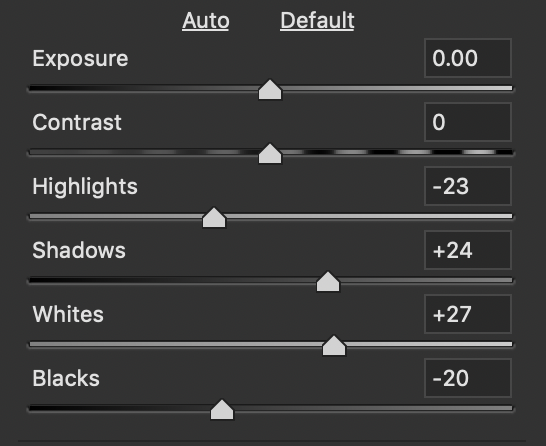
While brightness and contrast are universal, but depending on what editing program you are using (I will be using Photoshop for this blog) the terms and techniques can vary. This step is one of those cases. Some editing programs may use a tool called Luminance in place of some of the terms in this section. In the Camera Raw panel there are sliders to adjust the Highlights, Shadows, Whites, and Blacks of an image. Much like the Curves tool to the White Balance Tool, these act like a more fine-tuned version of the Exposure tool (though you can definitely use them together).
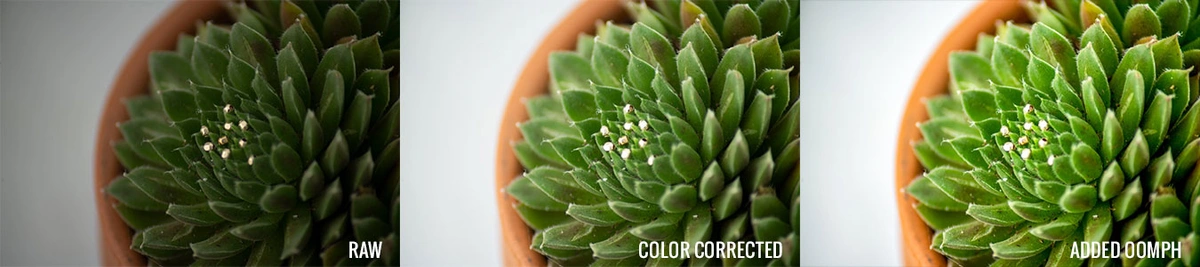
So now you can see the difference from Beginning to Step 2 to Step 3 in how much more your image now pops.
Step 4: How to Use Masks When Editing Jewelry Photos
Time - 1 to 10 minutes (depending on complexity of piece/s)
As you may have noticed in the final image in the step above, while the image overall looks good, our poor little beads are now overblown. You can barely even see the gold tone of the product. We have seen this many times on social media where the overall image has been edited to look good but in doing so the jewelry item is then washed out. There are two ways to combat this issue and both involve masking.
What is masking you ask? Let’s say you want the beads in the image to look silver instead of gold-filled. The easiest solution is to desaturate the image. But now you’ve also desaturated the succulent and that looks weird.

So basically you want the desaturation to only effect the beads. To do that you will use a mask on the desaturation layer.
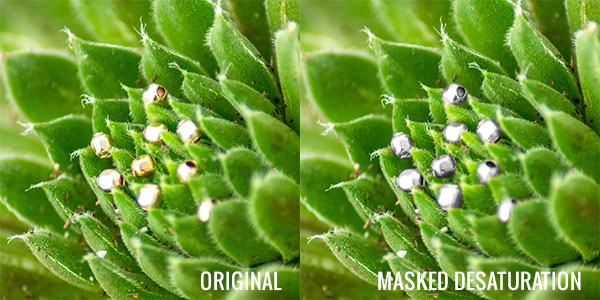
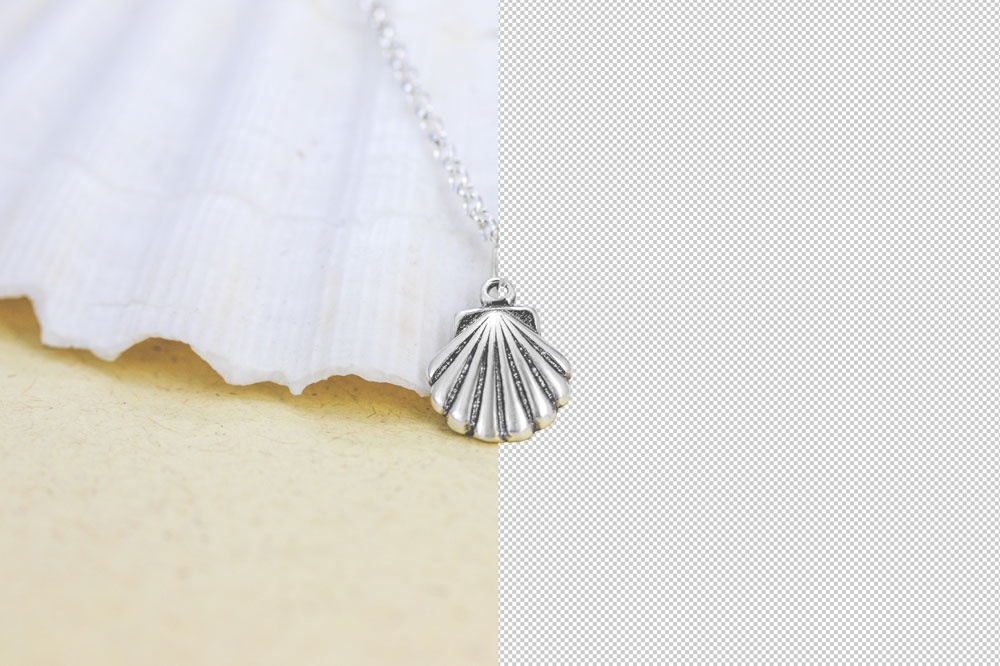
In short, a mask effects how much and where the layer it is attached to (such as our desaturation layer) is seen. Below is what the desaturation layer’s mask looks like compared to the final product. As you can see, even though the mask is somewhat sloppy (if you just saw the image of the mask, you would never guess it was for beads), the sloppiness is hard to see in the final product. In some cases this can work, in others you’ll need to be more precise, it all depends on what image you are working on and what effect you are attempting to accomplish. Black hides the effect layer (so the succulent is not effected by the desaturation) while white allows the effect layer to show through (therefore making our beads silver). Masks aren't just black and white either. Lighter grays allow most but not all of the effect layer to show in those areas, while darker grays allow only a small percentage of the effect to show.
After creating your effect layer (in this case the desaturation layer), you will then move on to masking that layer. I suggest looking up how to access the masking options for the program you are working on, unfortunately the ways of bringing up the masking option is very varied between programs.
After setting up the mask option, you will now use a brush to specify which areas you want the effect to show through and which areas you want the effect to be hidden. In this case since we wanted only the beads to be effected, we first filled the layer with black (to hide the effect), then used a feathered white brush to brush over where the beads are to let the effect show through. An easy way mask out your piece is to outline the item (as discussed in the clipping section at the end of this article) and then fill in the outline. Since the beads were so small in the example image I just used a medium sized brush to make the beads' general shapes instead of the outline method (hence the sloppy look of the mask.)

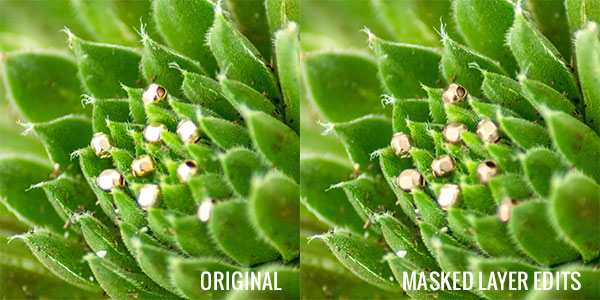
So how does this help you with fixing an overblown jewelry piece? To keep your piece from being overblown you’ll either need to 1. Mask out the edits you have worked on thus far to fix the overall image or 2. Add new edits that only affect the jewelry piece in question.
My preferred method is to start masking out the items as I go along so I won’t have more steps down the road. Once the edits get to the point where the jewelry pieces are overblown I’ll start to mask out the jewelry (or even pieces of the jewelry) so everything looks nice for the final product.
Sometimes the items overblown from the start and you’ll need to add fixes anyway. For this image the beads were not only overexposed, but also the gold coloring was washed out. To fix this we’ll lower the exposure on the bright spots and add a color overlay to all the pieces to bring back that nice gold-filled look.
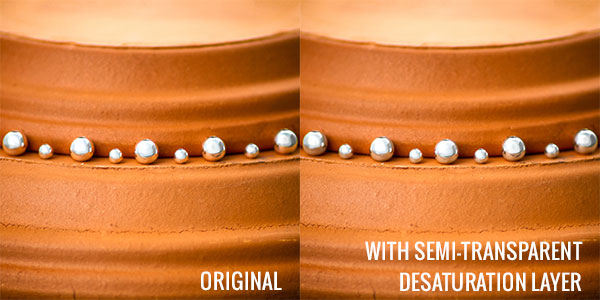
You’ll really want to get comfortable with masking because it’s always a good rule of thumb to desaturate your silver jewelry products. Silver really tends to reflect the environment and when that happens it no longer looks silver which can be confusing to your customers. When your silver is on a plain white background or in a position where it’s not reflecting something from its immediate environment (like when the silver is facing you) you’ll want to desaturate it completely. In cases like the image below where the beads are reflecting the orange of the pot you won’t need to desaturate the orange reflections completely but doing so slightly can help the silver stand out from the background.
Step 5: Spot Healing/Healing Brush
Time - 1 to 10 minutes (depending on how much you feel needs to be edited out)
This is another step that you might not need but can be extremely useful. Spot healing is a tool that removes image defects such as dust, debris, someone who was walking in the background of a model shot, or even your camera’s reflection in the jewelry piece. Healing works by filling in the trouble spot to match the surrounding area.
One of the reasons why I chose the photo I did was to really illustrate how helpful the tool can be and the difference it can make on a jewelry photo. The image would be nice except for the fact that the succulent is absolutely covered in dirt which makes it hard for a customer to focus on the jewelry. To put it simply, the dirt in the photo is distracting.
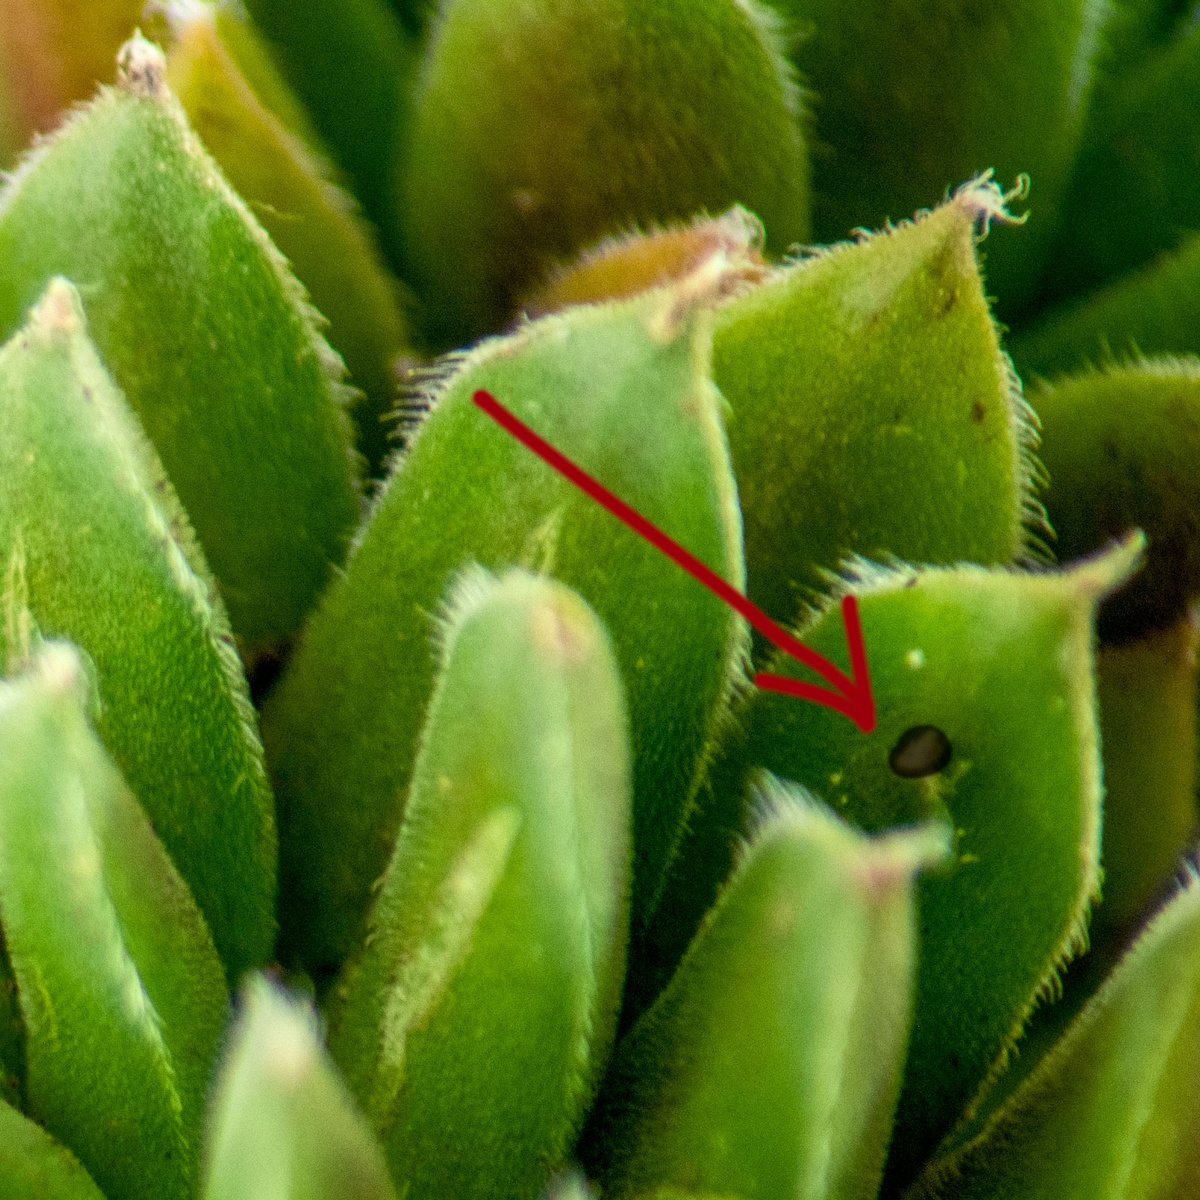
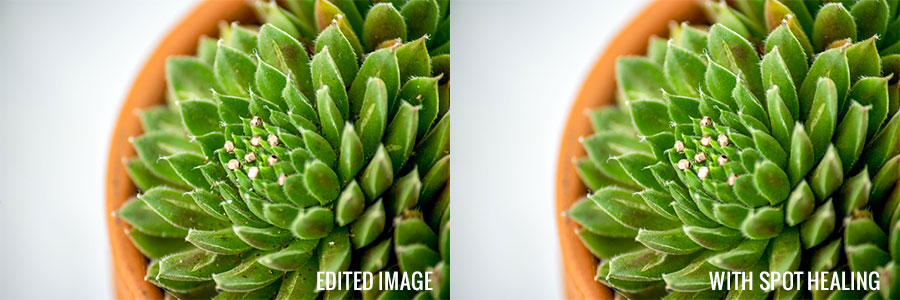
To use the spot healing brush you’ll want to make the area you brush on slightly larger than the thing you are trying to heal out. In the photo to the left you can see the black spot – that is the brush area. It is covering a huge white spot that you can somewhat see beneath the brush which is the thing we are trying to heal out. As you can see the brush area extends just beyond the spot – and remember you don’t need to be perfect on this. When it is done the spot should blend in with the surrounding area.
Now you can see what the image looked like before and after using the spot healing tool. What a difference it makes!
Step 6: Cropping Your Jewelry Images
Time - 1 minute
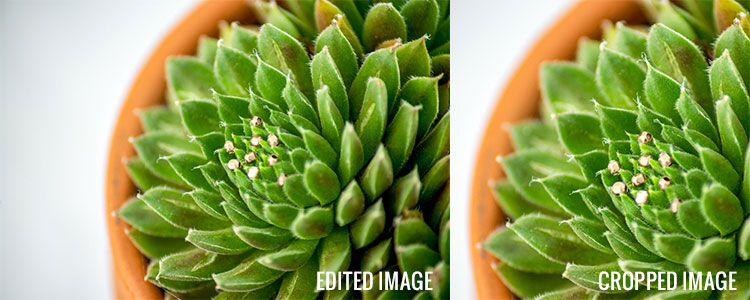
Now the photo we’ve been working on is a nice shot of gold-filled beads, but they get lost when you’re looking at the entire image. You see them but by showing so much of the photo they are not the focus like you want them to be. That means you’ll need to crop in the image to force the beads to be the main focus. Square is a great format since it is very versatile. It not only works great across all social media platforms, it tends to be the main format for the product listings on many eCommerce website designs as well.
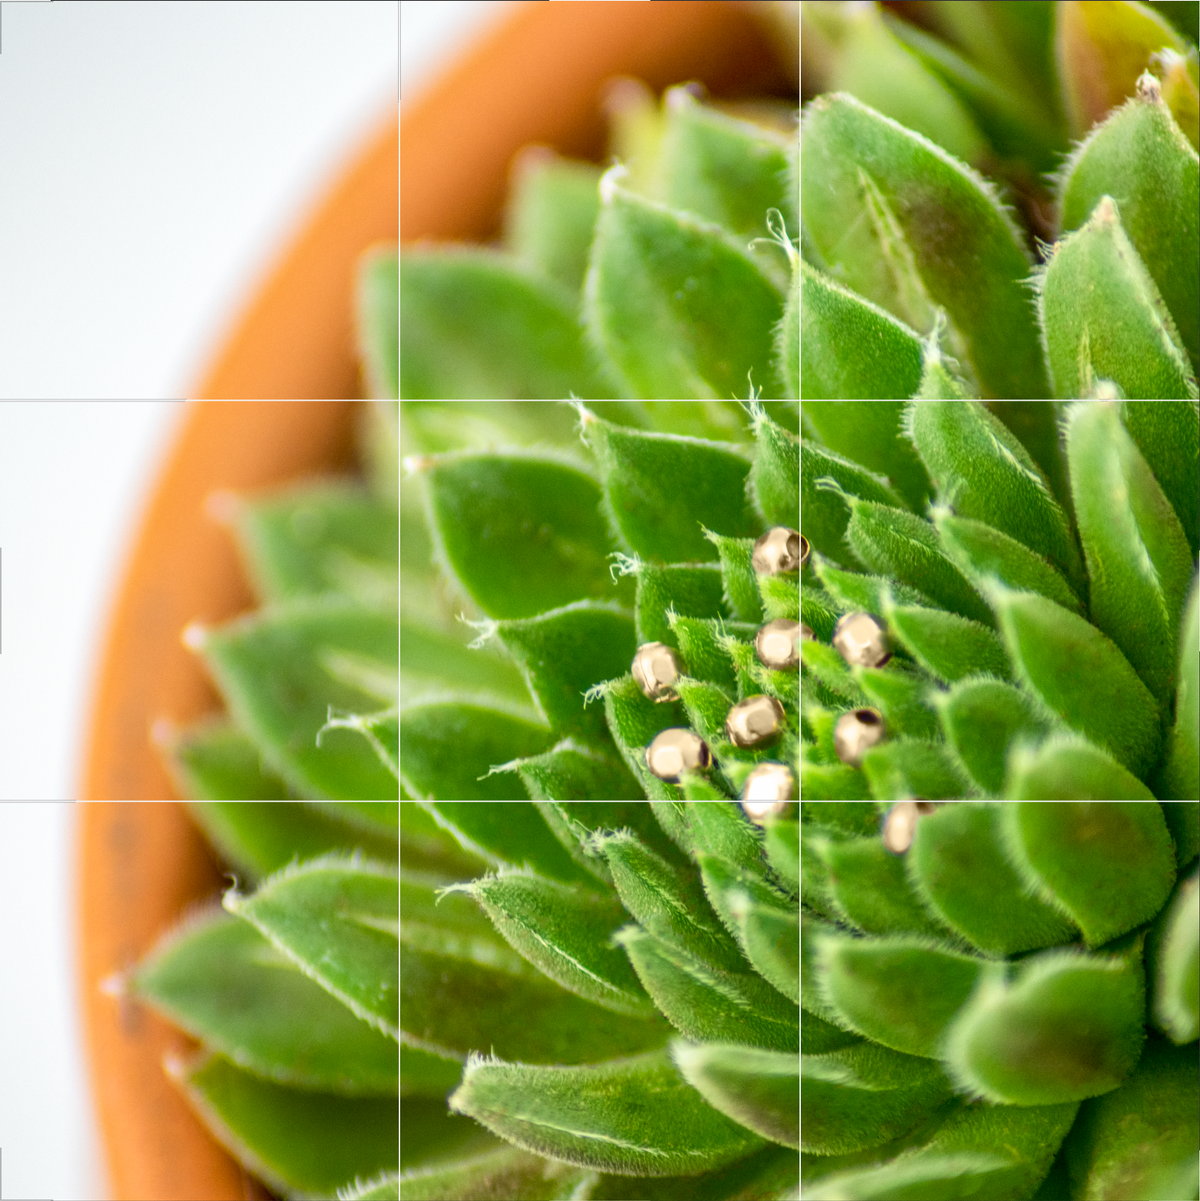
There are two simple formats that you can use as reference to crop your photo – have your item be dead in the center or use the rule of thirds. The rule of thirds basically divides the image into thirds and when cropping. You’ll want your item to fall either on one of the lines or on an intersection of two of the lines, as shown to the left.
As you can see below the beads are now more of the focal point after the image has been cropped.
Step 7: Adding a Filter to Your Jewelry Photos
Time - 1 to 10 minutes (it will be shorter if you know what filter you want and longer if you are playing around trying to see what works best)
Congrats! You are now on the final step of the basics of editing your photos!
As I said in the beginning adding a filter to your images is a great way to make them not only look cohesive, but more recognizable on social media. Instagram has plenty of filters, but if none of them suit you, most editing programs and other photo apps you can download have a plethora of filters that you can choose from. Choose a style that matches your branding and stick to it!
As you can see below our image has come a long way. The first is the image without editing, the second is with basic editing, and the third is with everything to show how everything comes together!
Tip - Once you are done editing all your photos, look over the final images as a group. This way you can make sure all the images are cohesive - some images may have turned out different than the rest and this is the best way to see where the issues are and correct them.
Clipping Your Jewelry Images
Time - 1 to 10 minutes (depending on complexity of piece/s)
Clipping is the process of removing the background from your image, leaving only the jewelry piece showing. If you look at our website, you’ll see that all our item images have been clipped out and are shown on a pure white background.
There are several reasons why we clip our item images, some of which include:
- Jewelry items will look more professional on a pure white background
- Customers have an easier time browsing through the thousands of listings since there are no distracting background elements
- Clipping makes it easier to use the images for advertising and in our catalog
- Props are often seasonal or trendy so staged images can quickly feel outdated
Since clipping is a laborious step, many jewelry artists use an outsourced clipping company. Cost can range from $.25 to over $6 per image depending on the complexity of the item being clipped. Most clipping service providers will have your images finished within 24hrs. You can shop around with the different companies to see which will suit your needs better.
If you don’t want to spend the money on getting the items clipped, you can clip them yourself with different editing platforms. You’ll be basically making a mask (see Step 4 in the previous section) of the background to remove it. Unlike on Step 4, you’ll want to be very precise for this one. You’ll also want the brush to be harder/less feathered (unless your item is blurry in certain spots) so that you’ll have nice hard lines along the edge of your piece.
Brush Method for Clipping Jewelry Photos to a White Background
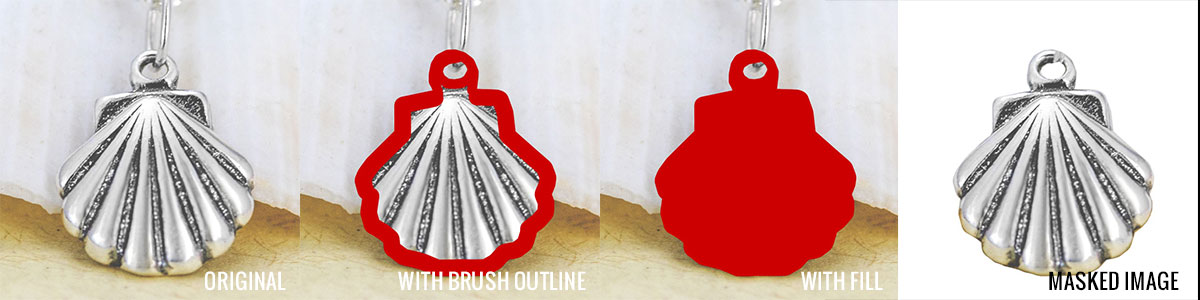
One method is to make an outline of the item using the brush tool. This method is the most versatile between platforms and is the best method to use while on mobile apps. The smaller your brush size the more precise your lines will be. If your piece has a cutout spot (think jump ring or hole) you’ll also need to draw around the edge of that so the background that can be seen through the cutout spot can be clipped out as well. After you are done making the outline you’ll need to fill in the rest of the mask, which I do using the Paint Bucket in Photoshop. For other platforms you may need to keep using the brush tool until you have filled the entire area in.
A good tip is to hold down the Shift key (on a computer) as you click around the jewelry piece. This will give you nice straight lines between where you click. When you encounter rounded spots you’ll want to click closer together whereas in straight spots you can click farther apart.
Pen Tool Method for Clipping Jewelry Photos to a White Background
Another clipping method is to use the pen tool. You'll still outline the item just like with the brush method, but this time you won’t need to worry about issues stemming from using a brush tool such as opacity and feathering. To make the lines curved, click where you want the point to be then drag to give you the curve handles. When you are done you can use the Direct Selection tool to adjust the points and curve handles until you are happy with the result. Once you are done you can apply the path as a mask to the image (some programs may require you to fill the path which you can then apply to the mask.)
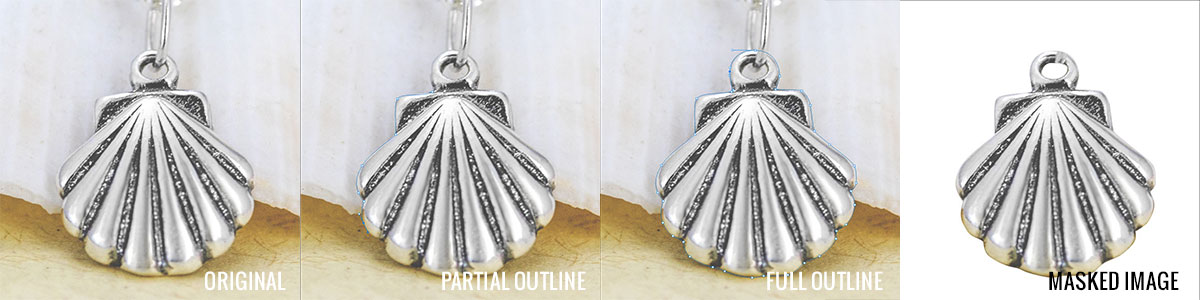
One thing I do want to point out – in the original photo the item looked fine, but once it was clipped the reflection of the yellow really stands out. This illustrates the importance of desaturating sterling silver items completely when they are clipped out.
Auto Select or Auto Clipping
We generally don’t use these editing tools on jewelry items due to the fact that jewelry tends to reflect its surroundings and therefore the program has a hard time distinguishing what is jewelry and what is background. This option could work on dark or patinaed silver or non-silver jewelry that is photographed on a light background as long as there are distinct edges (aka no reflections blending into the background).
Saving Your Jewelry Photo Files
We always save the working files (which would be PSDs in this case since we use Photoshop) so we always have access to the clipping paths and original image so if there is ever a mistake, we can easily go back in and fix it. It also allows us to easily place a high-resolution version of the clipped image in whatever situation we need it in. If you need the clipped image for the web or don’t need the working file for whatever you’re working on, PNG is a great file type that has a small file size while keeping the background transparency.
Free Editing Programs
Photoshop & Lightroom are the most common photo editing software. We know that these can be expensive (even with the lowest monthly Adobe subscription available for them) and that you have other expenses you need to worry about, so we’ve compiled a list of free software that you can use instead.
- Pixlr
This web-based software is very similar to Photoshop with many similar tools and features. The interface is simple and intuitive, making it easier for newer users to get editing quickly. It does include ads, but depending on how good you are at blocking them out they should be no issue. - Adobe Photoshop Express
While this version is watered down compared to the full Photoshop program, this is still a great program to do quick and easy edits on your photos. You can use this program on both the web and as a mobile app. - GIMP
GIMP has long been the free opensource competitor to Photoshop, offering many of the same features and perks. You can change the interface and download plugins for the software so you can customize the program to your needs. But like Photoshop it can be overwhelming, especially if you are just starting with editing your jewelry photos. - Snapseed
This mobile-only application includes many in-depth editing features (such as masking) with an easy to use interface. Available for both android and apple.
These editors are the more in-depth programs we’ve found that are free. There are many more free apps and programs that offer less features but may work better for you if all you need is simple and quick fixes.
Advanced Editing Tools
There will be times when the basic edits may not be enough. Think of basics as “universal edits.” They can usually be turned into a preset and applied to an entire shoot, as long as you kept the camera settings and lighting setup the same throughout. The next set of edits we’ll be talking about can sometimes be grouped with the basic edits in a preset, while other times they apply only to one image and can’t be applied universally.
Curves
We talked about curves a little bit, but I’ll go over it in more depth here since it can be a powerful tool when you are editing jewelry photos.
The Curves tool allows you to make specific edits across the shadows, mid-tones, and highlights range. You can see in the image below that you have a line going from the lower-left corner to the upper right. The lower left represents the blacks of the image, while the upper right represents the whites.
How to Use
You can adjust the curves tool by creating and moving points. As you can see there are already two points created - the one for the whites and the one for the blacks. Dragging the black point up will lighten the dark areas of the image. While dragging the white point down will darken the highlights. You can adjust both points or add in extra adjustment points anywhere along the line. Simply click somewhere along the line to add a point and then drag up or down to brighten or darken that particular range.
Let’s say you want to increase the contrast of your image, how exactly would you do that with the curves tool? You’ll create what’s known as an S-curve. To do this you will leave the white and black points where they are, then add in a highlight point and a shadow point. Increase the highlight point and decrease the shadow point to create an S-curve shape. What’s nice is you can control exactly how much you want to adjust your highlights and shadows to create the perfect contrast for your image.
I like to add a “matte” look by creating two points near the black portion of the line and then dragging the black point up. It’ll turn an area of blacks into gray.
Histogram
The lighter gray graph you can see behind the line represents the histogram of the image. A histogram depicts how much of the image falls into the different areas of the tonal range. So if there was a huge bump on the left side, your image has more dark tones than light tones. And vice versa if there was a bump on the right side, that means your image has more light tones than dark.
Reds, Greens, & Blues
You may be thinking that the curves tool seems really simple for it to be in the advanced jewelry editing blog. What makes the curves tool stand out is your ability to not only adjust the tonal range (whites through blacks) of the image but the range of the reds, greens, and blues of an image. You’ll notice above the adjustment area there is a dropdown menu that says RGB. That means that you are currently adjusting all the reds, greens, and blues of the image.
Understand that there is a difference between the main RGB adjustment that you have already learned in basics and the adjustments that happen when you mess with just the reds, greens, and blues on their own with the curves tool. If you were to adjust the blue curves you’ll notice that dragging the line up won’t lighten the blues, but instead add more blue to whatever area (highlights, mid-tones, or shadows) you adjusted. Lowering the line won’t make the blues darker but instead, reduce the blues or add more yellow to that tonal range.
So how exactly is this useful in practice? You may take an image where the shadows have a blue tint to them while the rest of the image is fine. You can then use the curves tool to target the blue shadows directly instead of having to do an adjustment that affects the entire image and mask out where you don’t want it to hit.
Fixing Overexposed/Underexposed Photos
Badly exposed metals images will lose most visual structure. For instance, wire starts to look like flat sheet metal since you can no longer see shading and contours.
To avoid this issue, try to shoot your jewelry at the correct exposure and worry about fixing an under/over-exposed background when you edit your final images. Your jewelry is so much more important than the background. A helpful tip is to shoot your images in RAW format. Raw saves more information than jpegs so if you make a mistake you will have an easier time fixing the white/black areas.
But, sometimes you just end up with an overexposed or an underexposed jewelry piece so let’s talk about how to fix that. First off, revisit masking techniques. Often, the jewelry will be too bright or dark as compared to the background so you will only want to make the edits to the piece itself. If you don’t know how to use masks, read our blog Editing and Clipping Your Jewelry Photos. You'll want to be familiar with it since I reference masking several times throughout the rest of this article.
Unfortunately there will be times where editing cannot fix your image. Instead of spending an hour trying to fix an unfixable image, you may just want to retake the photograph. As you get used to editing your jewelry photography you'll get a good feel of what can and can't be salvaged through editing.
Exposure Tools
First, make your mask of the jewelry item, then start on your edits. Here are a few different tools you can try:
- Levels - this allows you to adjust the blacks and whites of an image. You want to adjust the output levels, which is the bar below the histogram. For underexposed metals draw the black slider to the right, and for overexposed metals draw the white slider to the left.
- Exposure - For underexposed images drag the Exposure and Offset sliders to the right to add in lightness while dragging the gamma correction slider to the left - this will help reduce the added texture that comes with underexposed metals. For overexposed metals, you'll want to do the opposite.
- Camera Raw - Here you'll want to focus on adjusting the Exposure through the Blacks sliders under the basics tab. For underexposed metals, you'll want to increase the exposure, shadows, and blacks, maybe even reduce texture and clarity if there are a lot of scratches. For overexposed metals, you'll want to reduce the exposure, whites, and highlights.
Adding in Color
For non-silver pieces, you will most likely need to add back some color. First, you’ll start off by correctly exposing the piece before you do this step. Find a photo with the same type of metal that has a good exposure and color and use the color picker tool on a nice midtone spot. Move back over to your problem photo and create a layer with its blend mode set to color. This will add color without changing the tones of the metal. Brush in color to the areas that need it, making a mask if needed.
For the GIF below I created a mask and then used the paint bucket tool. As you can see the results aren't perfect so use sparingly. Obviously, this can also bring up the issue of faking metals, which is unethical should you color a piece to look like gold and send the customer a silver item. But it is not unethical if you were to use this technique to bring back color to a gold-filled item that was so washed out it looked silver since you are actually helping out the customer to see what the metal color actually is.
Completely Faking It
When adjustment layers just won’t do the trick and you don’t have the option of retaking the photo, you do have the option of faking your metal tones. This may be necessary when you sell a prototype piece before you circle back to photography edits. Metal tone edits will work for both underexposed and overexposed metals. Both require a middle gray tone to fix the midtones, though different blend modes (soft light, screen, overlay, luminosity) may fit your image better. Don't be afraid to cycle through the blend modes to find the best fit.
Flat Metals
When it comes to flat pieces of jewelry with little dimension, the gradient tool will be your best option. As before, you’ll want to create your mask, this time focusing on one surface that needs the fix. Add your gradient, making sure it matches the lighting of the image, and play with the layer blend mode.
Wire
For wire, your best option is to use the brush tool. If you don’t have a steady hand the easiest way to create a path that follows your wire is to hold down the Shift key (on a computer) as you click around the jewelry piece. This will give you nice straight lines between where you click. When you encounter rounded spots you’ll want to click closer together whereas in straight spots you can click farther apart.
Once you have a path that follows the wire, you then double-click on the layer to open up the layer options. Choose an inner glow and adjust the size and opacity to fit your wire and image.
Removing Spots/Light Streaks
This is a common issue for many jewelers who photograph their pieces. While you can do your best to minimize the chance of capturing spots and light streaks, sometimes it will happen regardless. Here we will discuss a few ways to remove them in post-production. This blog is made using Adobe Photoshop tools, so if you use a different program just look up “(tool being discussed) (the program you use)” to find the equivalent for that program. An example would be "healing brush tool Snapseed" to see if Snapseed has a healing brush option. We do discuss several different tools, so if your program doesn't have one, it will hopefully have one of the alternatives.
Healing Brush
This tool may have different names under different apps, but how it works is generally the same across the board. Adjust the brush size to be just a bit larger than the area you want to heal. I suggest if the app allows it, to have the brush feathered a bit as well. Feathering is basically how soft the edges are: a hard brush will have a hard outline while a feathered brush’s edges will blend into the background. Using feathering on the healing brush will help the edits blend in with the unedited areas of the item. This tool works best for small things like specs, hair, and smudges but may have issues with larger areas like the light reflection on the stone.
As you can see below, I didn't just use the tool once. I did several passes to get the best look, which may be what you'll need to do as well.
Patch Tool
This tool is great for larger areas that need to be fixed. It allows you to control which source area you select to fix the problem area. When you have a stone or textured metal, the patch tool will allow you to pick an area where the pattern is similar enough for it to blend in. To use it you will lasso the spot that needs to be removed and drag that area to a similar-looking area. Sometimes the automatic filling will not look pleasing so you may have to try a couple of times.
There are two settings that can change the outcome of the look: Normal and Content-Aware. The normal setting will copy over the texture and colors of the area into the problem area whereas the content-aware setting will try to match the new fill to the surrounding edges of the problem area. You may need to experiment with both to see what option works best for your problem area. And just like with the healing brush tool, you may need to do more than one pass of the patch tool to get the best looking fix.
Clone Stamp Tool
In instances where the automatic fills of the Healing Brush or the Patch Tool don’t work, you may have to do the fixes yourself. There are a few ways of doing this, but the clone tool is probably your best option. As with the Healing Brush tool, you’ll want the edges of the tool to be feathered to help the edits blend in.
First, you’ll need to define the clone source by Alt-click (Windows) or Option-click (Mac) on the spot you want to clone from. Brush over the problem area to fill it in. You can change the opacity to help blend in the changes. Multiple clone sources may be needed in order to properly fix the problem spot.
Try to pick a spot that’s not too close to the area you want to fix or to other unwanted elements. The clone tool mimics your brush movements so you could possibly draw in those unwanted elements. Notice how in the GIF below how the clone tool is just shifting over the light streak since the source was defined too close to the brush area.
Color Correcting Metals and Stones
Different lighting conditions can change the colors of your metals, sometimes drastically. It is a problem when your gold-colored items end up looking more like copper or your silvers look more gold. In order to properly convey to your customers what type of metal your jewelry pieces are, you may have to do some color correcting.
Make sure your monitor has been calibrated so it is displaying colors correctly. Otherwise, you may end up turning your metals green. We also suggest having the piece on hand to look at as you color correct. Or have a reference metals chart that you can use when editing photos.
Use a Mask
In most cases you’ll be doing edits that are specific to the metal or stone so you’ll probably need to use a mask, otherwise, the entire image will be affected. I suggest that after creating the adjustment layer for a large edit area you create your mask before you color correct. This way you can easily see where your mask is applied. Once your mask is ready, you can then work on color-correcting the metal or stone.
Hue/Saturation
The Hue/Saturation tool is very powerful. The default option is for the tool to work on all colors, but you can edit just the reds, yellows, greens, cyans, blues, and/or magentas of an image. This is helpful especially when it comes to editing colored metals - I tend to edit the reds and yellows instead of using the master when it comes to correcting gold-toned items. I find it helps keep the gold-toned items from being too monotone.
The hue slider will adjust the color, the saturation option will adjust how colorful or gray the edits are, and the lightness option can brighten or darken the colors.
Curves
The curves tool is another option for color correcting metals. It will have less range than the Hue/Saturation tool as it only can edit the reds, greens, and blues, but it can still be a great tool for your arsenal. Follow our instructions at the beginning of this article to see how to work the curves tool.
Turn Colored Metals Into Silver
You may have items available in multiple metals. Sometimes it can be easier to just use one photograph and desaturate the metal to make it silver. The trick to making it look more realistic is to brighten it after you finish desaturating. Silver is brighter than gold, gold-filled, copper, brass, etc. so just desaturating the item won’t look realistic. I like to brighten using curves or levels so that I can adjust the midtones without flattening out the shadows and edges.
Stone Colors
You may also have styles you sell that are available with multiple gemstone or CZ color choices. You can use the same tools and processes as above to change the stones from a single photograph.
It is easier to change the colors of transparent stones when you keep the adjustments within similar tonal ranges. For example, use a dark red stone base image to make a dark green stone replica image. Or, use a light blue stone image to clone into a light purple. While it can be done, trying to turn a dark green stone into a light green one is difficult and may not look right due to the differences in the way the light reflects through the material.
Again, take care that your edited photos are true-to-life compared to products your customers will receive. It's okay to use one sample image to show stone selection options to customers; but, the edited images should accurately reflect the stone colors and saturations they can expect.
Prepping Your Jewelry Photos for Export
Check for Scalability
Will your image look good on the full width of a computer screen as well as on a tiny phone screen? This is especially important if you will be including copy on the image. What looks good on your computer screen may be too small to read once it's shown on your phone.
You'll want to check this before and after cropping your image - if you can barely see your piece at a small size you may want to crop in more closely for your social media exports. While this step is a little bit easier to do on a computer screen, you can check for issues while on your phone. First you'll want to look at the image fit to the screen you're working on (aka no piece is cropped out of view) - does it look pixelated? Can you see the details of the jewelry? Next zoom out so the image is much smaller. Now how does it look? Finally zoom in (again this will be a little bit harder to do on a phone since it has much less real estate than a computer and it is hard to gauge how large a website header for the computer will be on your phone.) Is it pixelated? If your jewelry was out of focus is it too obvious at such a large scale?
Cropping Images
Once you have completed all of your basic and advanced edits to your photos you'll then need to prep them for exporting. First make sure to save your file (and always save several times throughout editing if your software doesn't autosave for you) in case you accidentally make a change you can't undo. Now you'll need to list out the places you'll be using the photo - will it be going just to your instagram or will it also post as a product image and as a header to your website?
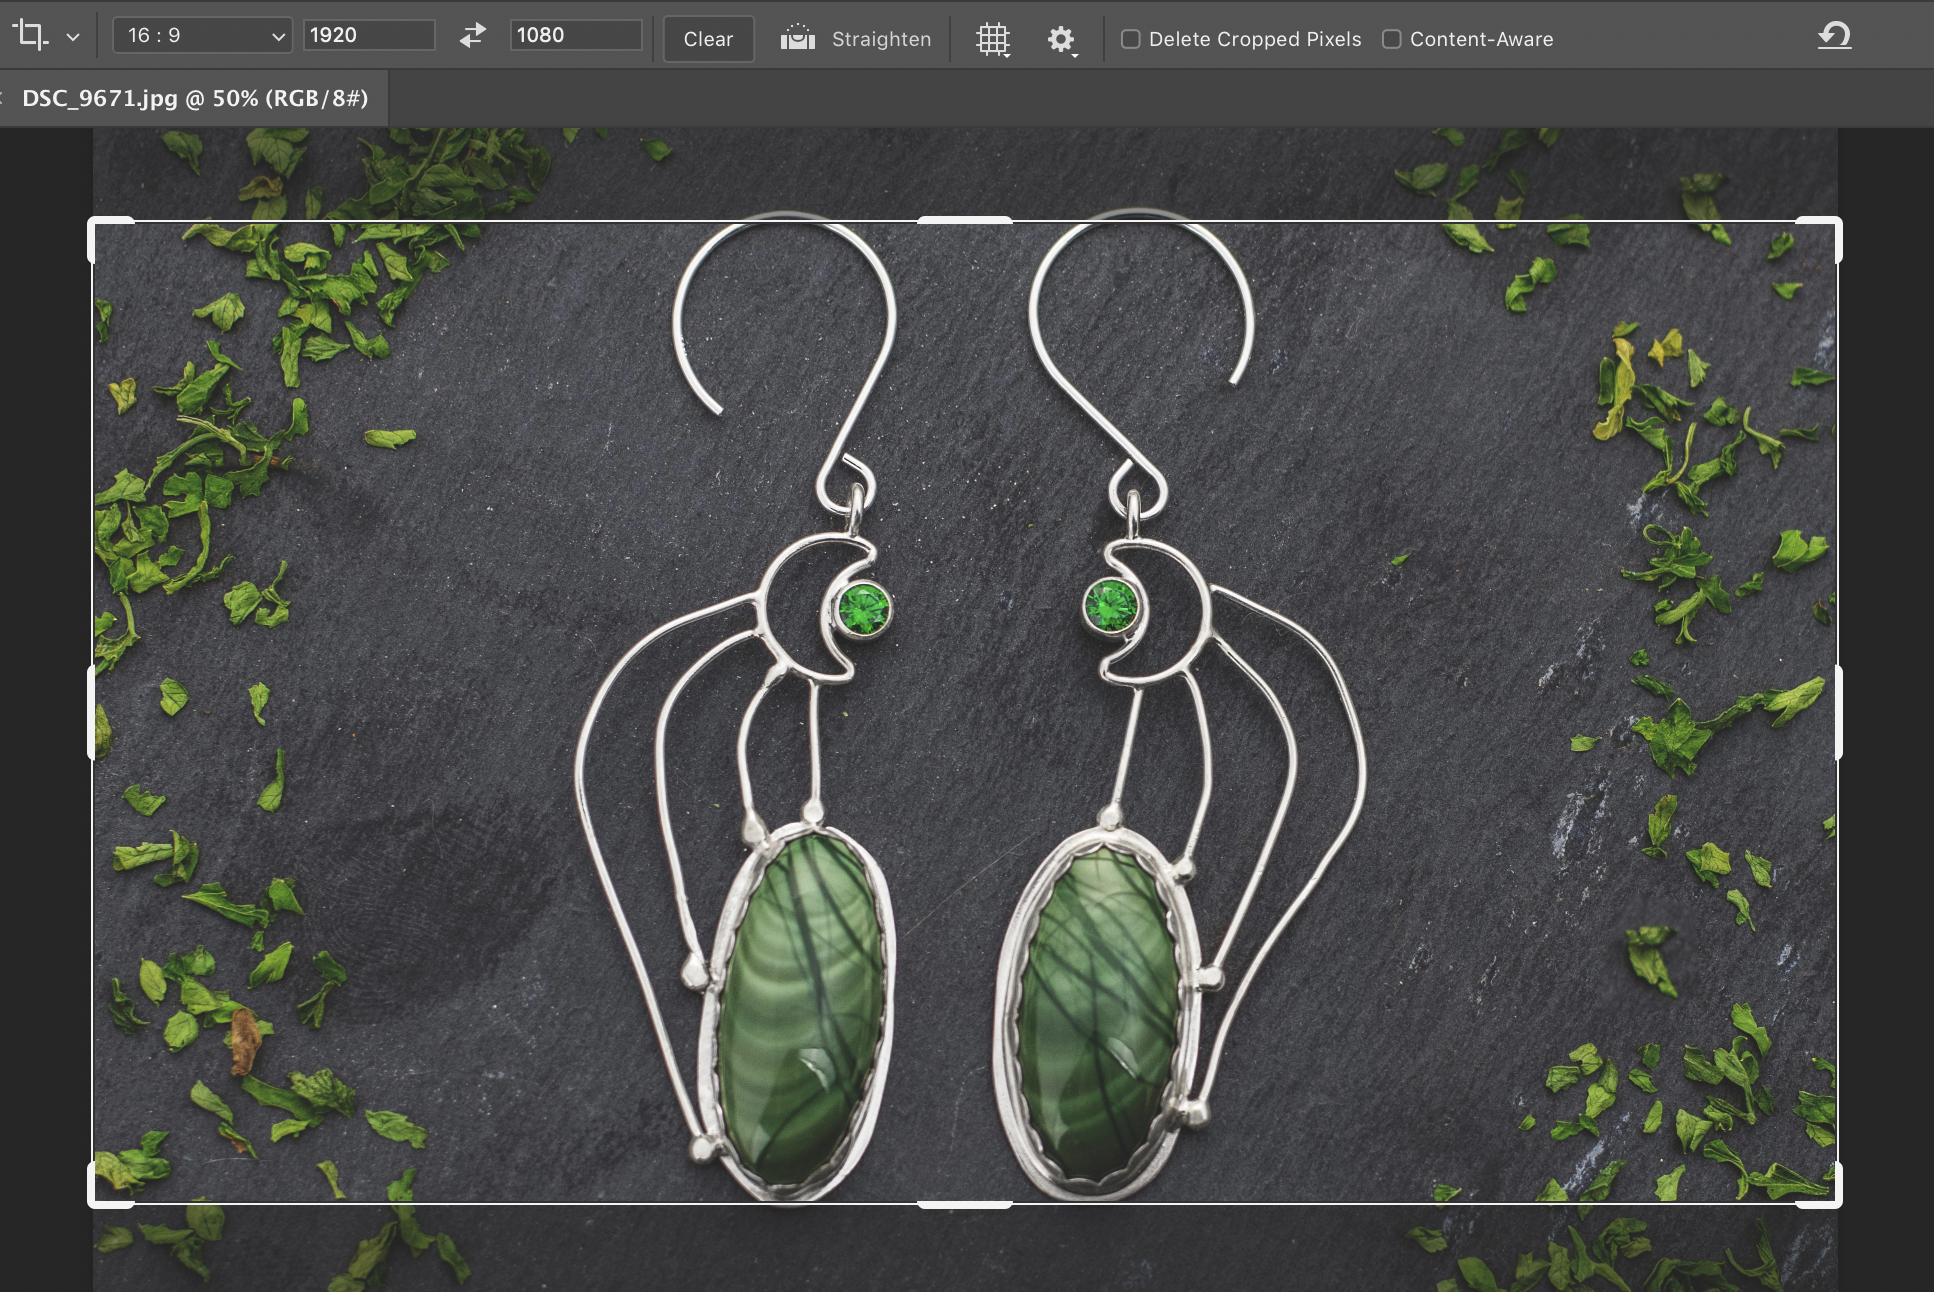
If you are posting to several places you'll want to crop and resize the image to fit the where it'll be posted. Instagram generally takes 1x1 ratio images while your website header may take more of a 16x9, or even skinnier, ratio. Want to post it on tiktok? Now you need to worry about a 9x16 ratio. While it is possible for some images to be exported once and resized in app to fit the different ratios, some images should be cropped before export in the editing suite. Most apps will have crop presets where you can choose which ratio you want. When I have multiple crop sizes I need to export I'll put the ratio as a suffix, so Green-Earrings_16x9.jpg so I know which is which.
Website headers may ask for a specific pixel ratio such as 1920px x 1080px. That translates to an image that is 1920 pixels wide by 1080 pixels tall (pixels being the web's unit of measurement.) Some editing apps will allow you to set those parameters in the crop tool so that your image won't just have a 16x9 ratio, it will have that exact size. This will help you make sure you aren't bogging down your website with overly large images with massive file sizes.
This may be more of a Photoshop issue, but make sure the box for Delete Cropped Pixels is not checked. Otherwise when you commit to a crop it will delete everything outside that crop area. This will of course make cropping for multiple ratios extremely difficult or impossible.
One thing to note - make sure to specify px after your number. Your image may be using a different form of measurement such as inches, if so when you type in 1920 by 1080, your image will end up massively large at 1920"x1080".
Exporting for Web
Some of you may have noticed that some images look fine on your computer but the colors look off once uploaded to your website. The problem is most likely due to having the wrong color profile.
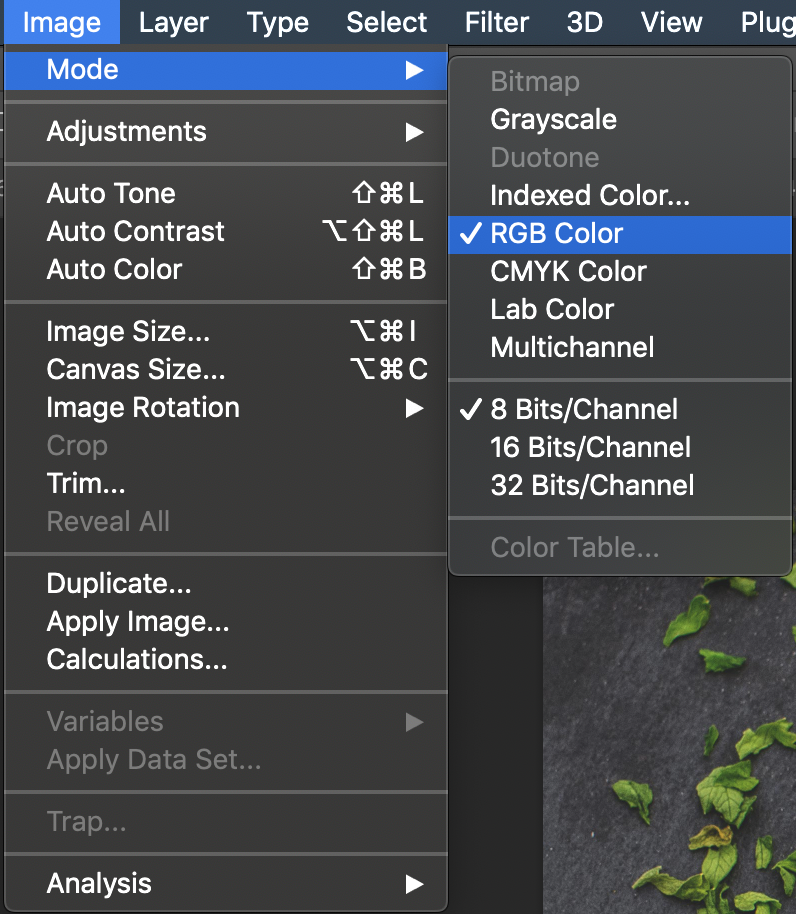
What are color profiles you ask? You probably have heard of them before though you may not know exactly what they mean. First up is CMYK - this profile is used for printing. Have a printer? Check out its ink cartridges and you'll see that it uses Cyan, Magenta, Yellow, and blacK. Most likely your image is set to this color profile if your colors look off on the web. To fix this issue you'll need to change the image's color profile to use RGB - which stands for Red, Green, and Blue. Now keep in mind if you plan on using the jewelry image both for print and web you'll want to save two versions, one with the CMYK profile for print and one with the RGB profile for web. When I do this I will add the word Print or Web as a suffix to the image name so I know which one is what.
To change the profile you'll want to go into the menu and select Image > Mode > RGB.
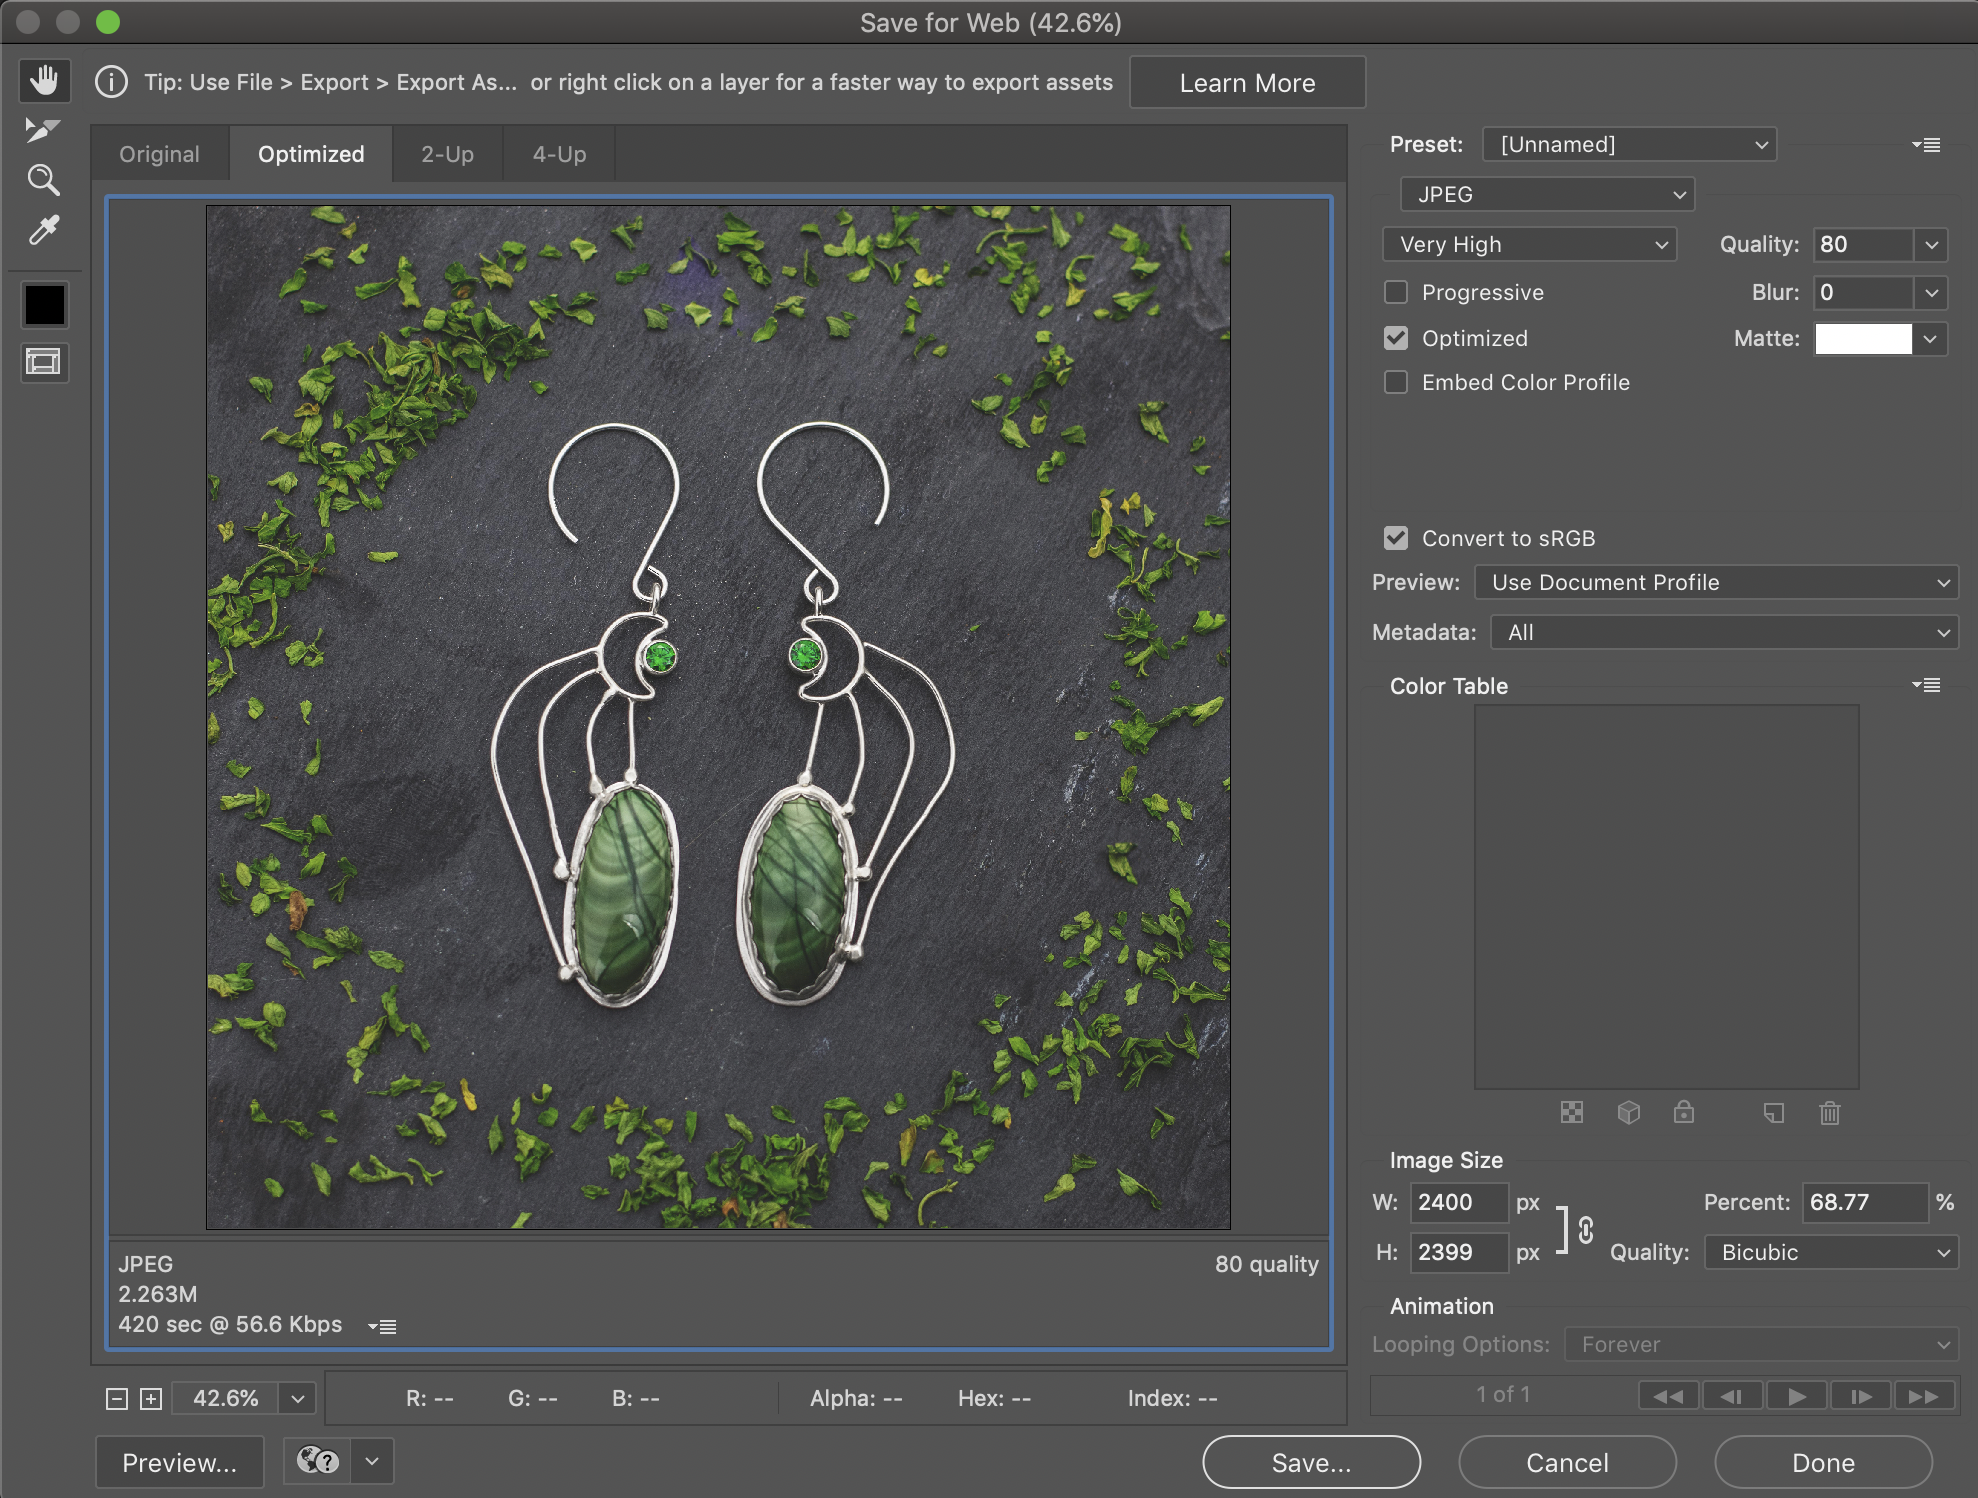
My preferred way of saving images for social media and websites is to use a legacy option called Save for Web. There it will automatically convert the exported image's color profile to RGB as well as give you options to adjust the image quality (to reduce the file size) and image size. I love this option because whatever sizing and quality changes I make here do not effect the working file. If I change the export size from 2400x2400px to 300x300px, my original file will still be at 2400x2400px.
Working Files
Always keep a Working File - basically the full size, uncropped image file that has all the edit layers. When I'm editing in Photoshop this would be my PSD files.
Why would you want to keep these files? If you were to resize an image for a thumbnail, let's say 100x100px and save, when you come back later to save for Instagram at 1800x1800px, you will have a very poor quality pixelated image. Best to keep a high quality working file on hand that you can resize without any degradation of quality.
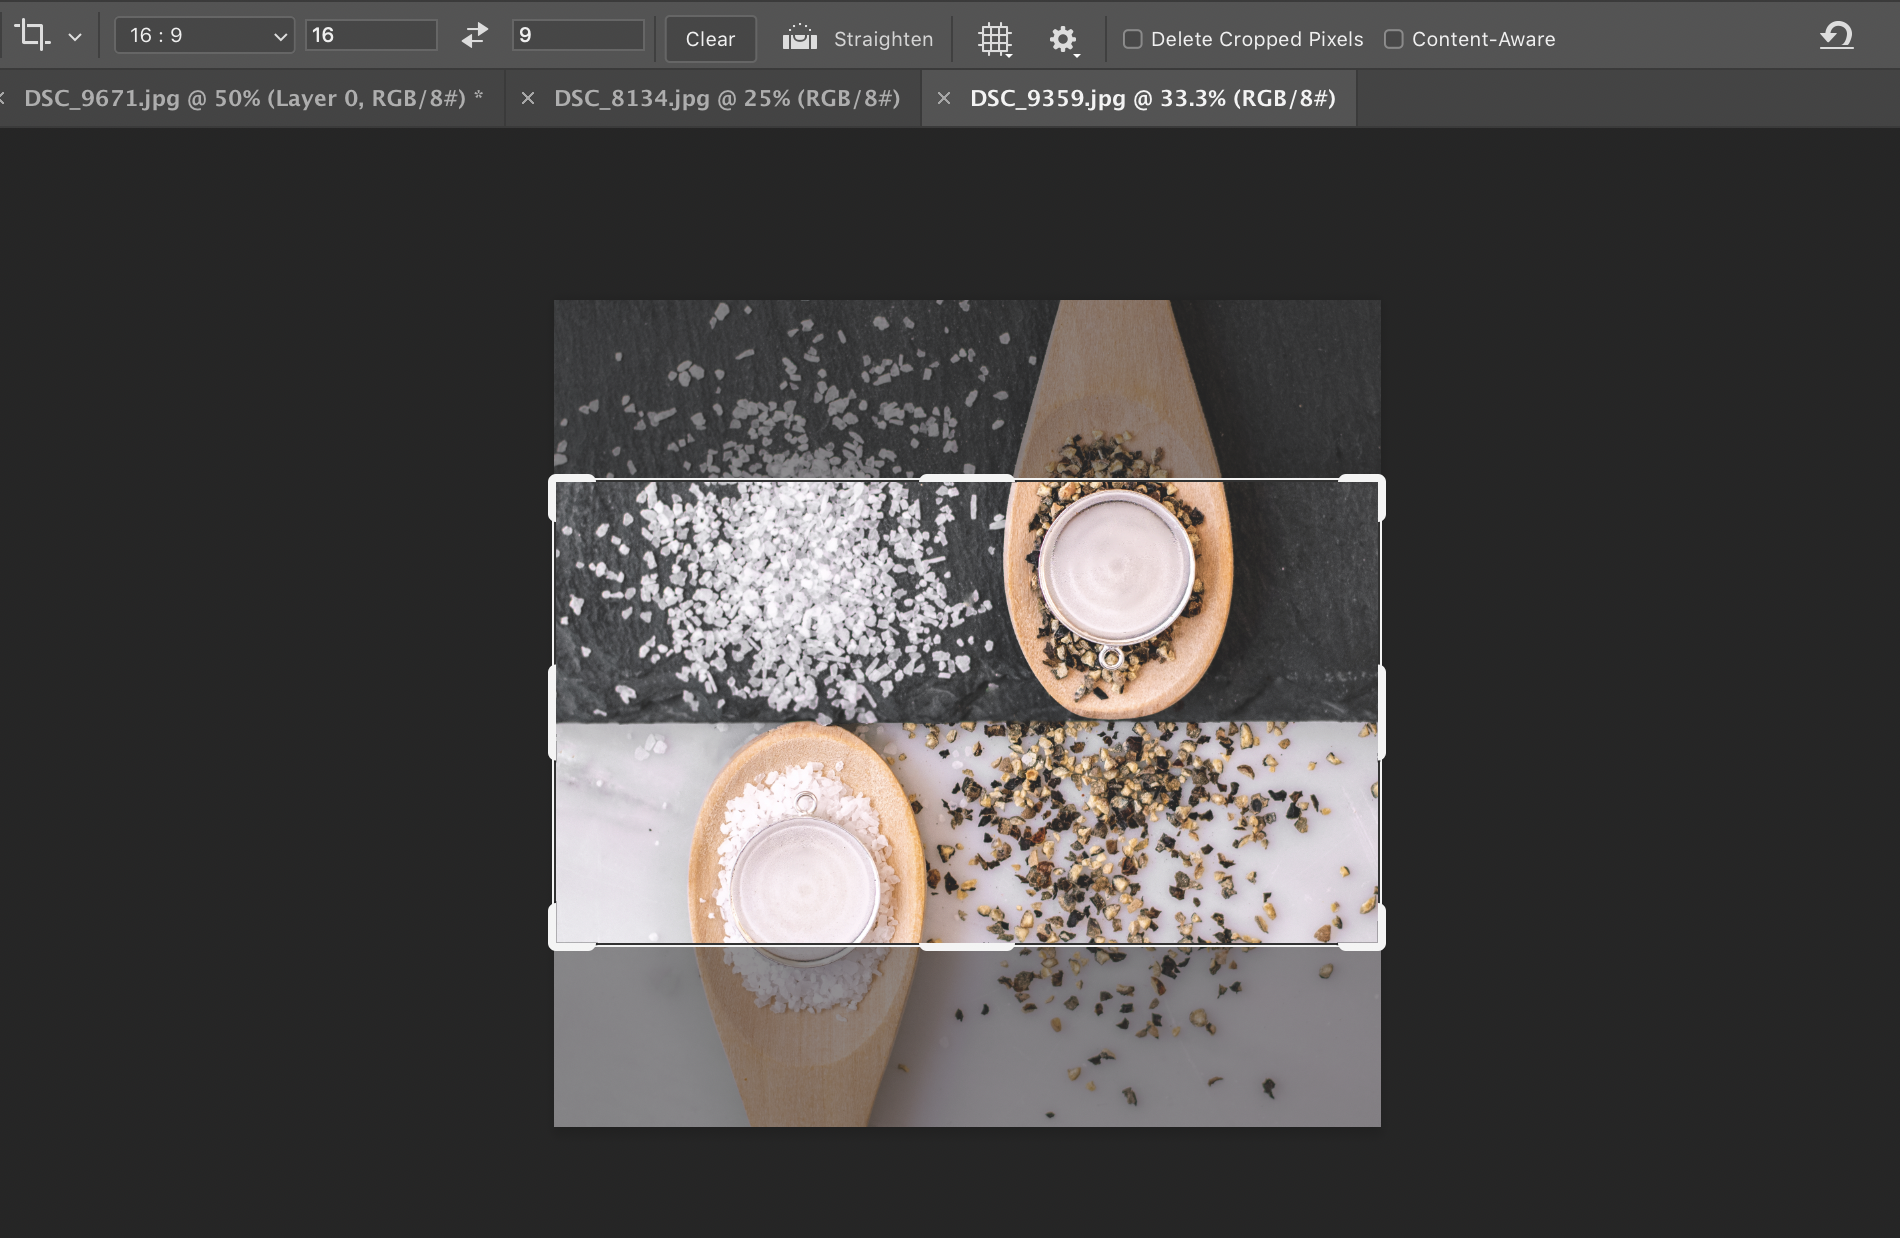
Another issue can come from saving after cropping. Let's say you saved an image after cropping it in a 1x1 or square ratio for Instagram and then come back later on and try to crop it at a 16x9 ratio for your website. Most likely you will be cutting off a lot of your piece depending on how close the original square crop was to the item. See how weird the image below would look? With such a close crop on the pieces, the image looks off and may come off as unprofessional on your website.
What to do if I:
Only Saved the Cropped Image?
Some apps have the ability to fill in blank areas when you expand an image. To do this in photoshop you will set the ratio or size you want the crop to be and then check the Content-Aware box. When you commit to the crop, the program will do its best to fill in the area. This option works best for images with simpler backgrounds. You can see how well it works with the GIF below:
Only have a Low Res Image?
First you need to understand what exactly resolution is. Let's say you want to submit your a jewelry piece to a magazine competition. The competition requests hi res images of at least 300 PPI with the shortest side of the image no smaller than 1000px. What exactly does that all mean?
Well from our last section you know that px means pixels so that when your image is exported the shortest side needs to be at least 1000px in length, that part is pretty easy. But PPI (or DPI) may be a new term for you. PPI means Pixels Per Inch while DPI means Dots Per Inch, which are the forms of measurement for the resolution of your image which is highly important when it comes to printing. Where pixels dictate how large an image is, PPI dictates how much information is packed into the image.
If you were to scale up two images of the same size but one has a resolution of 72 PPI and the other 300 PPI, you will notice that the 72 PPI is much more pixelated than the 300 PPI. Both images pictured below are 8x8 inches. The one on the left is at 72 PPI and the one on the right is at 300 PPI. See how much of a difference PPI can make on an image?

The magazine would probably reject the image on the left due to poor quality, it would be unprintable for them. Where might this problem come into play for you? Maybe the image you want to submit is only available from your Instagram. Most images after having been uploaded to a social media platform have their resolution reduced to 72 PPI, which means when you download the image it will not be print quality.
So how do you fix the image to make it print ready? The good news is editing programs have gotten pretty good at guestimating the missing data of an image. Granted you probably can't go from a 1x1in 72 PPI image to a 8x8in 300 PPI image, but you may be able to at least help the quality of your Instagram image. Watch the GIF below. At the start both are of the same size and resolution of 1080x1080px at 72 PPI. The left image is then adjusted to have a 300 PPI resolution, which you can see bumps up the image size to 4500x4500px - do not try to resize back down to 1080x1080px, you can't pack more pixels into a pixel. You'll notice that there are a few options tested from the Resample dropdown menu - these are the different ways in which your editing program tries to fill in the missing PPI information. You can see as I toggle through how the options effect the outcome of how sharp the new image will be. Once the image is resized, you can see best in the chain area how much less pixelated the resized image is.
Want to learn more jewelry photography tips? Check out these helpful articles.

