


Here are some tips and tricks on how to take your jewelry photography to the next level with your smartphone camera.
Knowing how to take your own jewelry photos is a great skill to have. Even if you usually send your jewelry out for professional photos or do shoots with a pro, there may be times you'll want to take quick photos without arranging an entire professional shoot. Read on for tips to easily take your own photos using your phone, a white background, and how to avoid some of the most common mistakes in jewelry photography.
How To Use Your Phone for Jewelry Photography
If you're able to invest in a DSLR camera, that's great! But you are always able to take great photos with your phone! Phone cameras have advanced to the point of being a great viable alternative to an expensive camera. Always be sure to research what options your specific phone has as capabilities can range between brands and specific models and operating systems. But the tips below are a starting point to understand taking your own jewelry photos.
Getting Started
In the camera settings, set your camera to save the largest possible files. Some Androids allow the user to enter a full manual mode, which allows you to turn your phone into a full blown camera. In iPhones be sure to choose Most Compatible, not High Efficiency. iPhones now also have Apple ProRAW if you want to shoot in RAW format - keep in mind these will be very large files.

Never use your phone's flash! When you use the flash on the camera it flattens out the piece. Have you ever seen restaurant photos of food that looks dull and lifeless? Odds are they were taken with a front flash. Amazing jewelry (and food) photography always has side lighting - this gives the piece more life and depth.

Also, never use your phone's zoom feature. Zooming to take the picture will cause pixelation or other unwanted distortions. Crop the image while editing afterward or step in closer to the jewelry piece

Prep Your Jewelry


Tip: If you do decide to use props, go with a theme. The theme can be based on the brand, the jewelry collection, or could be seasonal. A theme helps make your marketing more visually appealing and helps customers associate the images to your brand.
Setting up Lighting
A lightbox is always your best friend, but in the event that you do not have one here are some lighting basics:
Outdoor shoots in the shade generally work best. You'll get a nice natural light without the glare and sharp contrast of direct sunlight.

Another way is to set up the shoot by a window out of direct sunlight. Use a lamp, white sheet/paper, or foil opposite of the window to bounce light back onto the piece.

The third way is to use at least two lamps/light boxes (make sure they both have the same type of lightbulb). Best placement for the light sources is at the 4 o'clock and 8 o'clock positions around the piece. A third, softer light source can be set up directly behind the piece (another lamp or reflector works fine).
Tip: If you are getting harsh black shadows on your piece, set up a white sheet or piece of aluminum to reflect light in the area that is creating the shadow.
Taking Clear Shots
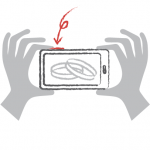
A phone tripod is the best solution. Simple phone tripods are readily available for $10-$15. If you don't have one, the best way to stabilize your phone is to use both hands and brace your elbows against your stomach or on a hard surface.

On most phones, you can also use the volume control on the phone as a shutter control. Do not use your thumb, your pointer finger will probably work best. Bluetooth shutter releases are also available for as low as $5-$10.
Use the burst mode - your phone will take multiple shots at once. This way you can choose the best photo from the bunch.

Tip: Do a couple of test shots and review before moving forward. Zoom in on the pictures in editing mode to see if you need to make any adjustments to the setup or the lighting. If you have one, look at the photos on a computer or tablet, the larger screen will help you to detect any issues with the photos.
Wrapping Up Your Photo Shoot
Review all of your shots and select the best ones. Make a new folder dedicated to the shoot and move the photos to it. Zoom in again on each to double check for flaws.

Once you have the chosen few images selected, you can edit the photos. Most phones have basic editing software, but if you want to get more in depth, you can check out third party apps. The most important edits are cropping, exposure, and color correction. Another helpful tool is the healing brush. This allows you to edit out things like hairs, smudges, dirt, and reflections. We have a great article that teaches you how to do basic editing an clipping of jewelry photos.
Going Further
There are many other things you can do to improve your photography.
- Watch videos on phone photography - they don't have to be dedicated to jewelry photography, many can give you great tips on the features of your phone, composition, lighting, and more.
- Find editing tutorials. You can take great shots but if you want them to be amazing you usually need to edit them. Apps generally have videos and tips on how to use them, but any tutorial on how to do basic editing will be a great help.
- Read up on your phone's features - there are many differences in taking photos not just between brands (such as Apple and Samsung) but between the models too.
- Look into photography and editing apps. There are many great free ones, but even $2.99 is a small price to pay for greater control and more functions. Just make sure to do your research before you buy - some even have free options where you can try out the app first.
- Get inspired. Cut out ads from magazines, look through jewelry tags on Instagram, create Pinterest boards. Study these photos - why are you drawn to them? What do you like about them? Does the style go with your jewelry collection?
- Finally - take photos! Experiment with styles and lighting, have fun with it! The more you practice the better you'll get.
Watch Janelle's Webinar
Janelle hosted a webinar all about using your phone for jewelry photography. Check it out for a more in-depth look at jewelry photos with a live Q&A.
Useful Phone Photgraphy Apps
Photography
Photographing in what's called a pro mode allows you to shoot photos on your phone as if you were shooting on a DSLR. Pro Mode lets you adjust the ISO, aperture, shutter speed, and white balance. Being able to manually adjust these settings is useful for doing large photoshoots that use the same setup so that your photos all turn out similar. Doing so will allow you to create editing presets that you can mass apply to the photos, greatly reducing your post processing time.
If your phone doesn't come with a pro mode, you can download an app that gives you all the options. Here's a few suggestions to check out.
- Halide - Free
- Obscura 2 - $4.99
- ProCamera - $13.99
- Open Camera - Free
Editing
There are tons of apps available that make editing your jewelry photos on your smartphone a breeze now. Below are some options you can look at, you may need to try a couple to see what works best for you and has the features you need.
- Snapseed
- Lightroom
- Adobe Photoshop Express
- VSCO
Tips for Taking Photos on a White Background
White backgrounds are a standard in today's competitive jewelry market. They are the most versatile and timeless background you can have for your jewelry photography. White does not interfere with the color of your items and presents your jewelry with the least distraction. It is essential in giving your jewelry photos a clean, consistent look on your social media or website. Having good, consistent jewelry photography is critical to bringing and keeping traffic on your website.
Choosing a White Jewelry Photography Background
When choosing white backgrounds for photos, it is most important to consider the scale at which you will be taking photos. If your jewelry photography will all be in close range, it will not be necessary to purchase a large background. You should also consider the angle at which you will be photographing your jewelry. If you will be photographing at a flat or a very slight angle, it will not be necessary to acquire a large background. A smaller white piece of poster board, ironed cloth or paper will work.
However, if you want more flexibility or will be shooting at different angles, it may be better to get a larger "infinite" type of background. Using a sheet of white background material creates an infinity effect so you don't see a background crease or edge in your images. A roll of pure white paper (sized according to your needs) makes a fantastic seamless background, which can be cut and advanced when it gets dirty. You can also purchase some wrinkle-resistant cloth. Either can be suspended from a mounted dowel rod or dispenser arm.

One final option would be a photography light tent. These offer a wider angle of white background. Ultimately, your decision will be based on what works best for your setup and budget.
Challenges with Photographing the Color White
Photographing jewelry on a white background can pose some challenges, but there are simple solutions.
First, it may be difficult to find the shade of white and texture you desire. It is best to buy as pure a white as possible, which could mean spending a little more money. Buying a clean, smooth, bright white background will save you more editing time and effort in the long run.
Second, white can get dirty fast. It is important to keep your background clean and clear of debris and dust. Wrinkles and creases also show up as darker lines on your photos. A good work around however would be to buy a roll of white paper that can be unrolled with the excess cut off if the paper gets dirty or creased.
Third, shadows can affect the look of your jewelry in images. Shadows can be used artistically, and can keep your jewelry from looking like it is floating on the page. You can even shoot your items on a reflective surface to add a little detail as well. Having consistent shadow areas for your jewelry photos is most important. Your product spread (on your website or social media) will look strange if the shadows are all going in different directions.
Lastly, when you start photographing your jewelry on a white background you'll discover something that may shock you at first: white backgrounds don't look white when shot. Instead they generally look gray or pick up the tones of the light in the room. Lighting your backdrop can brighten the white; however you can also make the adjustments in your photo editing software.
Consider Clipping Your Jewelry Photos
Another option for premium white backgrounds would be to have the image clipped with a photo clipping service. Photo clipping is a service that many websites offer on a per-image basis. Clipping an image involves cutting out the subject from the background. This can be helpful if you want a pure white background for your subjects, as you can just have the item clipped then artificially add in a white background (a shadow can be added, but keep it subtle). Remember to still shoot the item on white if possible, as white offers the least interference. Many clipping services can also do light and color correction on your images. Photo clipping companies often offer free sample images, so it is a good idea to send a few representative images to several sites to find which company does the best job for the best price.
3 Common Jewelry Photography Problems
Blurry/Low Resolution Photos
First and foremost, it is imperative that your pieces be clearly visible in your photos - they're what you're selling! When your item is not in focus, customers may be turned off by not being able to clearly see what they are buying. Close up/detail product shots, model shots and beauty shots should all show your item clearly.
Solution:
If you decide to invest in a camera, it doesn't need to be a top-of-the-line DSLR, but should have good manual controls (aperture, shutter speed and ISO) and good optical zoom capabilities. Your camera will need to record at the highest resolution, as lower resolution means more pixelated images. If you're using your phone, find out what camera features it has available. Some allow you full control or you may decide to download an app that gives you a full control camera. But make sure at minimum you know what your standard phone camera features and capabilities are.
Second, set up shots using a tripod for stabilization or have a place you can rest your elbows while you shoot. The more stable your camera is, the less likely you will have movement in your photos.
Third, set your camera to a low ISO setting: 200 and below for close up/detail shots and 200-400 for model/beauty shots.
Next, remember to be close enough to your item that you won't have to crop the image later. The smaller your item is in the photograph and the more you have to zoom in digitally, the lower the resolution of the final image.
And finally, make sure your piece is completely in focus. Some cameras have focus-stacking capabilities. If yours doesn't, you can use a higher f-stop setting to increase your depth of field. If you're photographing cuffs/bangles and want some of the item blurred to show dimension, make sure the critical points of the item are clear and the blurred parts are still easily recognizable. This is especially true on pieces that may have multiple levels, such as rings.
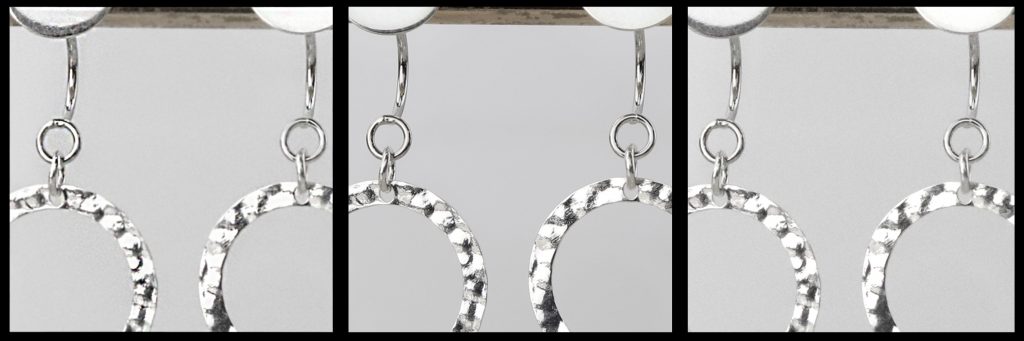
Below are examples of different levels of sharpness and resolution. The left image is an image that was taken slightly blurry, and to make up for that I sharpened it. You can see that the jewelry looks almost a little grainy, and has more contrast. The middle image was taken on a tripod with low ISO to compose a nice, sharp image. The image on the right was taken at a high ISO setting. You can see how the contrast is lower and the image is slightly grainy.
Bad Lighting/Coloring
Another common issue with jewelry photography is poor lighting. Poor lighting affects the representation of color. Too much light can brighten colors and too much dark can deepen or mute colors. Even if the darker or blown-out look is an artistic choice, it is still important to accompany the stylized image with a clear image that accurately represents your jewelry pieces.
Solution:
Jewelry photography (and generally all good photography) should have some areas of light and dark and a spectrum of tones in between. Too much dark or light can throw off how an item looks, and can hide detail and/or change color appearance. While images will look slightly different as far as color and brightness go depending on what medium the viewer is using (phone, computer, print) it is still important to try to optimize your photos to be as clear and correctly colored as possible.
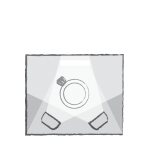
Be sure to photograph your images with a good light source. If your light is too bright, a diffuser helps to break up the light (a white or light colored semi-opaque piece of cloth or paper work well). You may consider investing in a light tent to shoot in, which range from $10 and up depending on size and complexity. A light tent is a white box made from paper or fabric in which you can set up your items to help control light/light diffusion on the pieces. These are usually collapsible for easy storage.
If you are working with a good light amount but are experiencing a halo of brightness around a piece, which particularly happens with silver, set your camera to a higher f-stop number. This offsets the change in brightness with a slower shutter speed, which will close down the aperture of the lens to restrict how much light is getting in the camera. This should eliminate the problem.
Make sure as you are shooting that the color of your item is well represented in your images. Some post-shooting image corrections may be necessary to make colors of items as true to life.
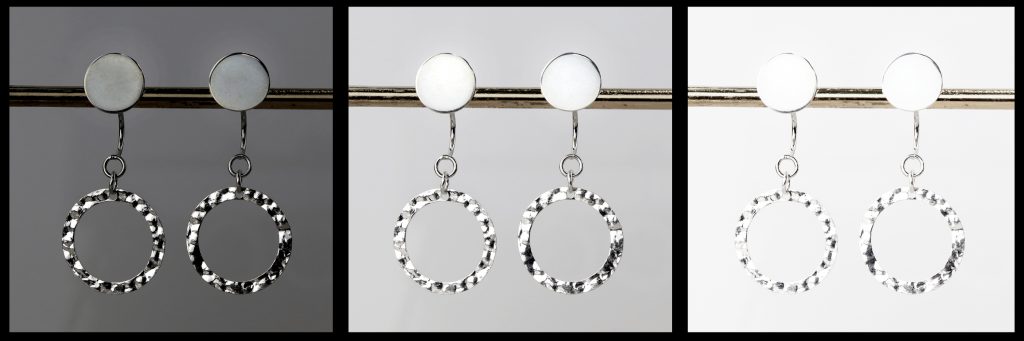
Below are three examples of lighting. The images on the far left and right may be extreme, however I have seen many sites that have the blown-out beauty shot without a clearly lit detail shot to represent the piece accurately.
Reflection
The last common issue in jewelry photography is reflection. This can be the biggest hurdle to represent your jewelry accurately as metals (especially brightly polished) act like tiny mirrors. The photographer and the setting can all be captured in the reflection. Perhaps the worst offender is shadows that reflect to show the item in black instead of gold or silver.
Solution:
Use awareness and positioning to your advantage when shooting your jewelry. Be aware of reflections in your jewelry, and use positioning to help angle your items for good reflections. In a pinch, use a sheet of paper or aluminum foil to dispel black reflections on your item. A light tent is also beneficial when dealing with reflections as the white walls of the tent will cast a neutral reflection on your piece.
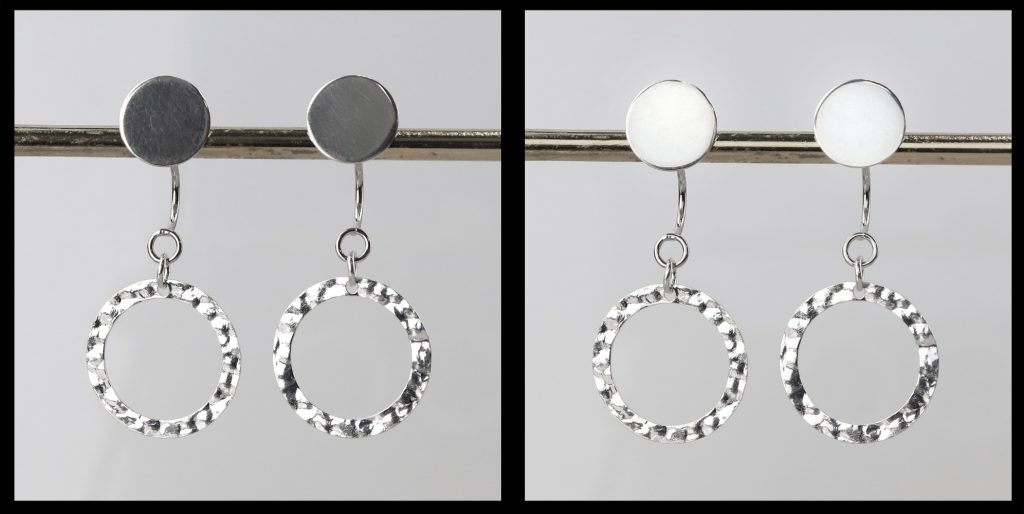
Below is an example of a bad reflection and a good reflection. The image to the left has decent lighting, however the flat studs are difficult to identify as silver. The image on the right was composed with a reflector, bouncing the light onto the flat surface to give it a bright silver look.
Jewelry Product Photography Best Practices
- Know your camera, whether you're using your phone or a DSLR - know the capabilities, limitations, and features available
- Take lots of photos and choose the best ones at the end
- Use a tripod or arm rest to make sure your camera is steady when shooting
- Invest in equipment like a light tent to help control lighting
- Use good lighting when photographing jewelry
- Be aware of reflections, and use positioning and/or reflectors to ensure correct representation
- Avoid using zoom when possible. Shoot close to the piece and crop if needed. If you need zoom, focus on finding and using a good optical zoom option.
- Set camera to a higher f-stop number if a light halo appears around your piece, when shooting manually
- Color representation is accurate, if not use post-processing to correct
- Use High Resolution + Low ISO number for clear/optimal images, if you're shooting in manual mode
Read More About Photographing Your Jewelry

